How to Throw a Lord of the Rings Party on a Budget

{This post contains affiliate links. More info Here.} 

My idea of a really good party is curling up in front of a roaring fire with a good book and an empty house. So when I tell you that I hosted a theme party for my kid, complete with costumes and *gasp* guests, you will have a full appreciation for what it took to get me there mentally. The last theme party I threw was 3 years ago at someone else's house (which is a good deal easier).

Never mind that I postponed this one about 6 times and celebrated 6 months after his actually birthday... we got there. And I think my fellow Lord of the Rings geeks are going to like it. I know that most people’s LOTR these days are based on the movies but ours is based on the literature. A brief note about we we love Lord of the Rings specifically (and exceedingly) is at the end of this post.

(Note: This party was originally hosted in 2014 and I haven’t hosted another theme party since… so I’m feeling guilted by my own blog into hosting a Narnia party in 2019… stay tuned!)

COSTUMES

I'm going to take you through our cast of characters first. The kids did a great job putting these together on a tight budget. And I got away with very minimal sewing...
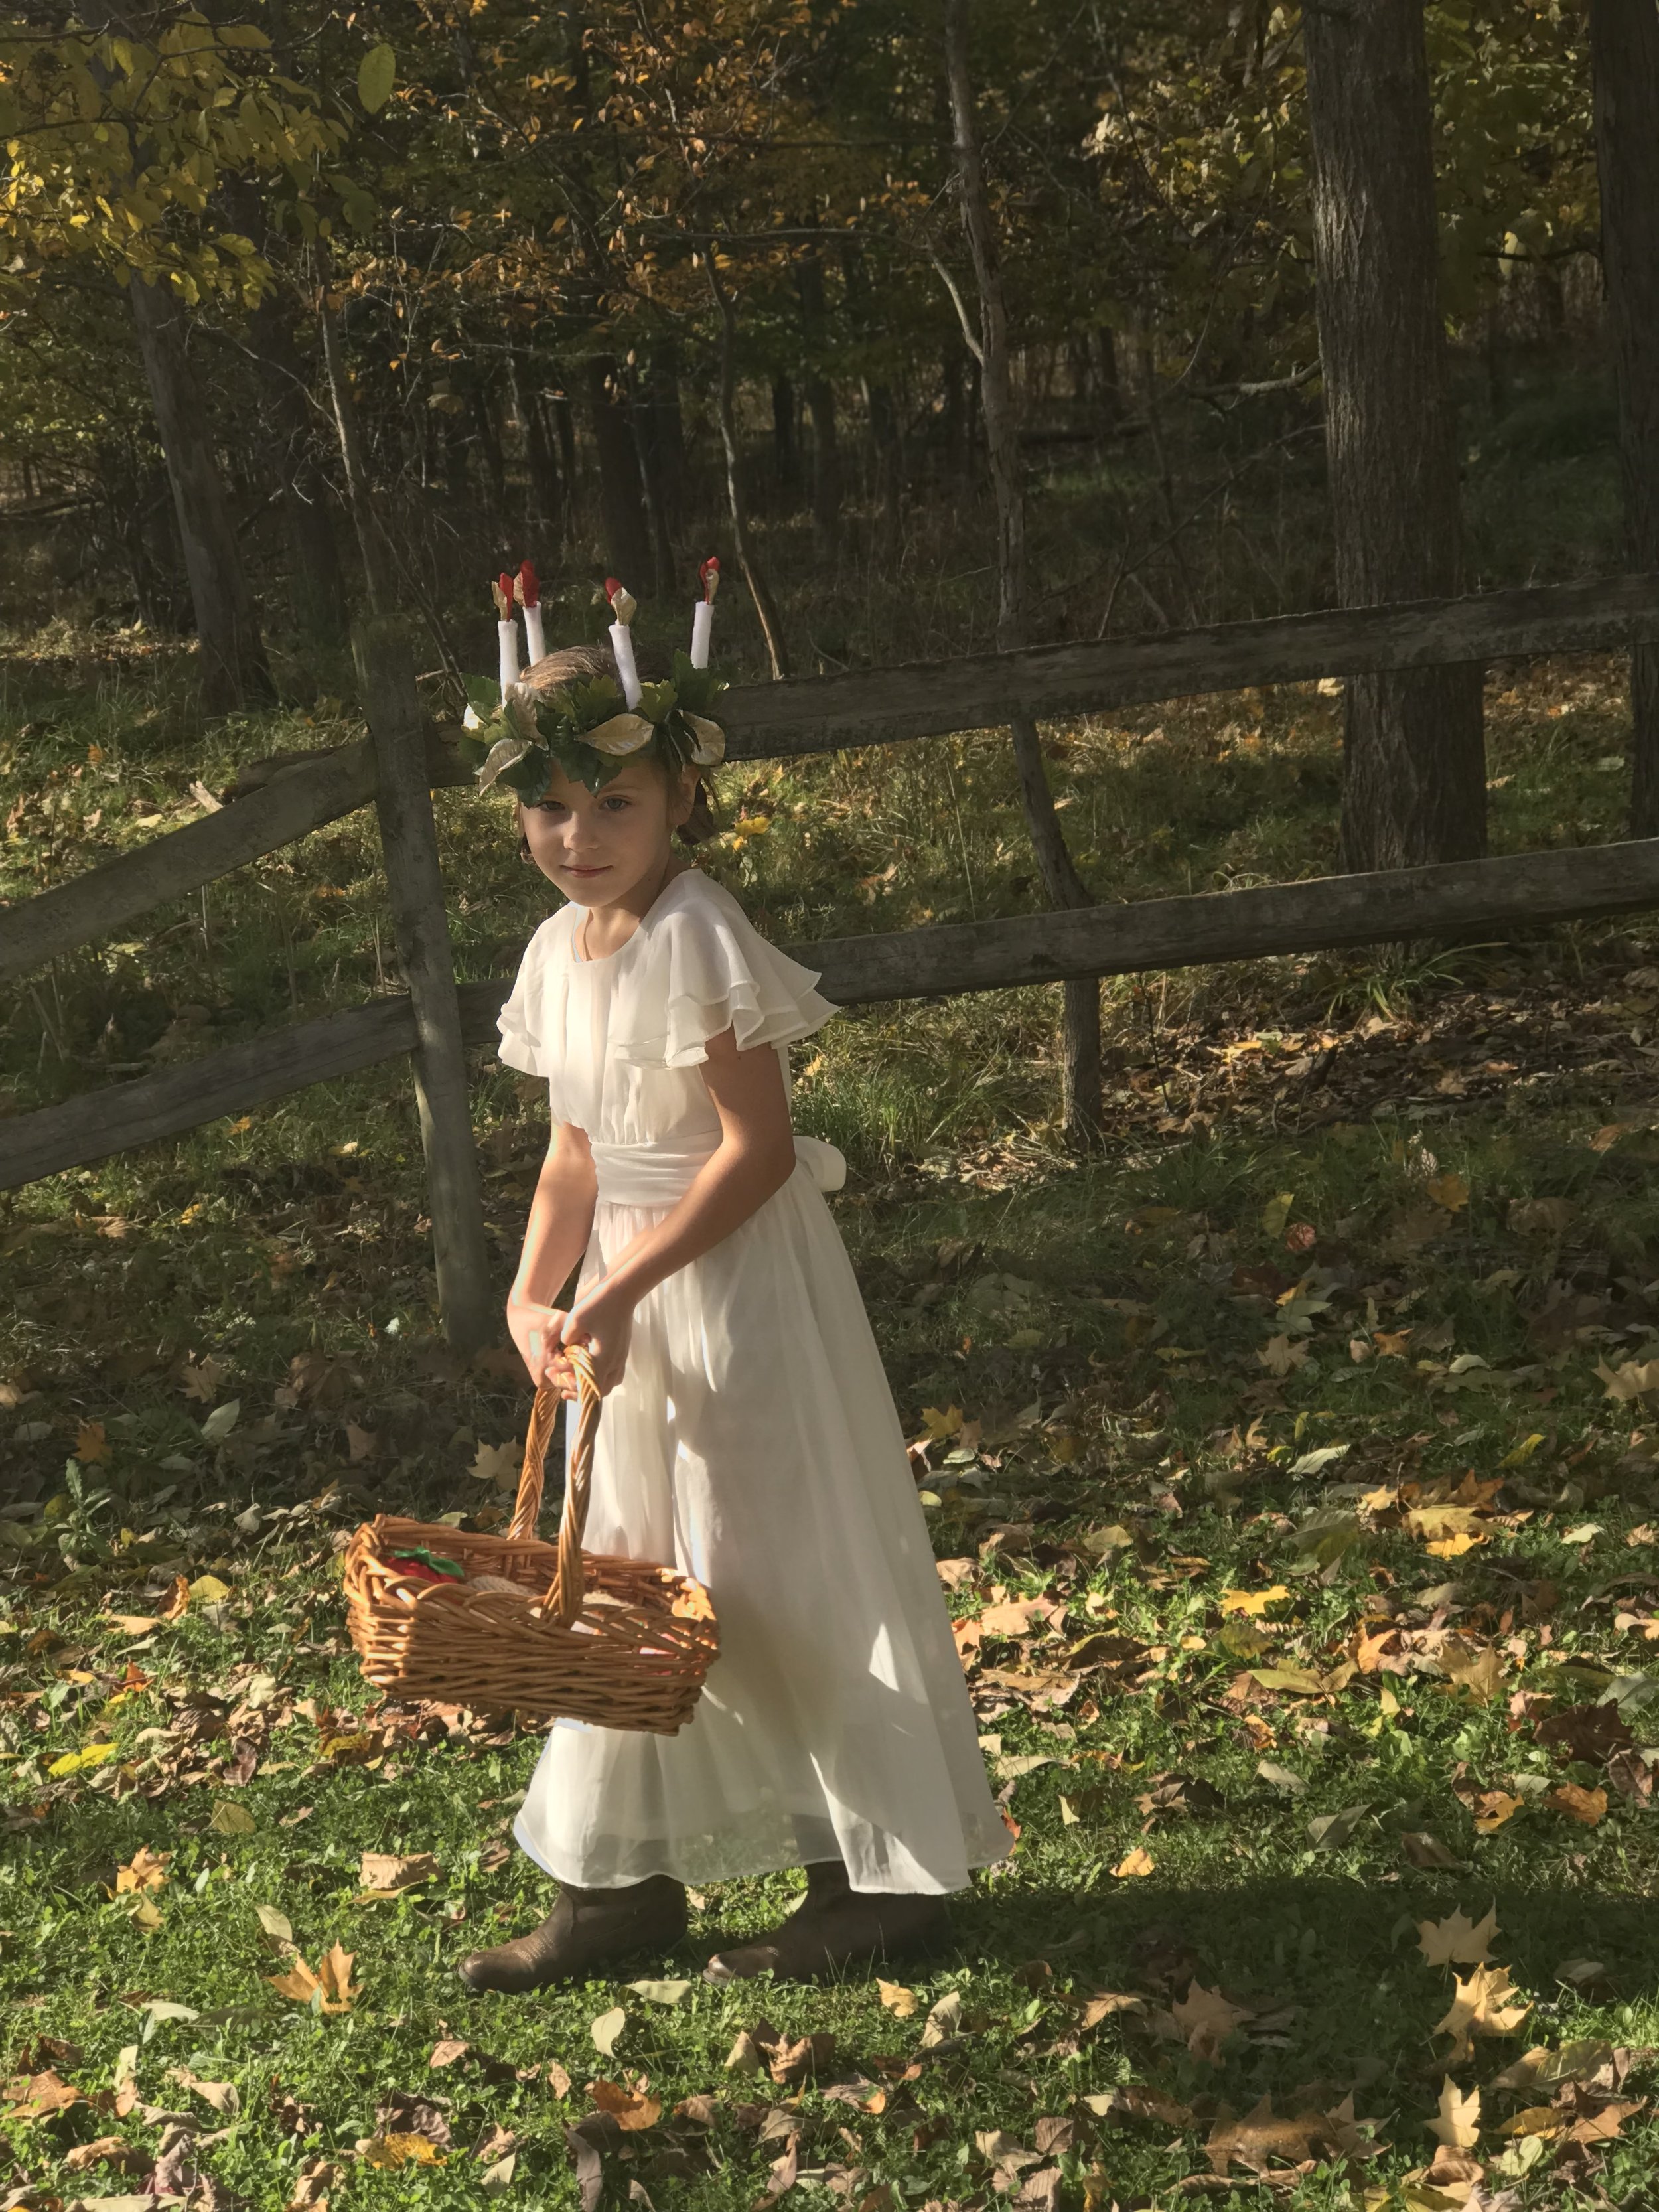
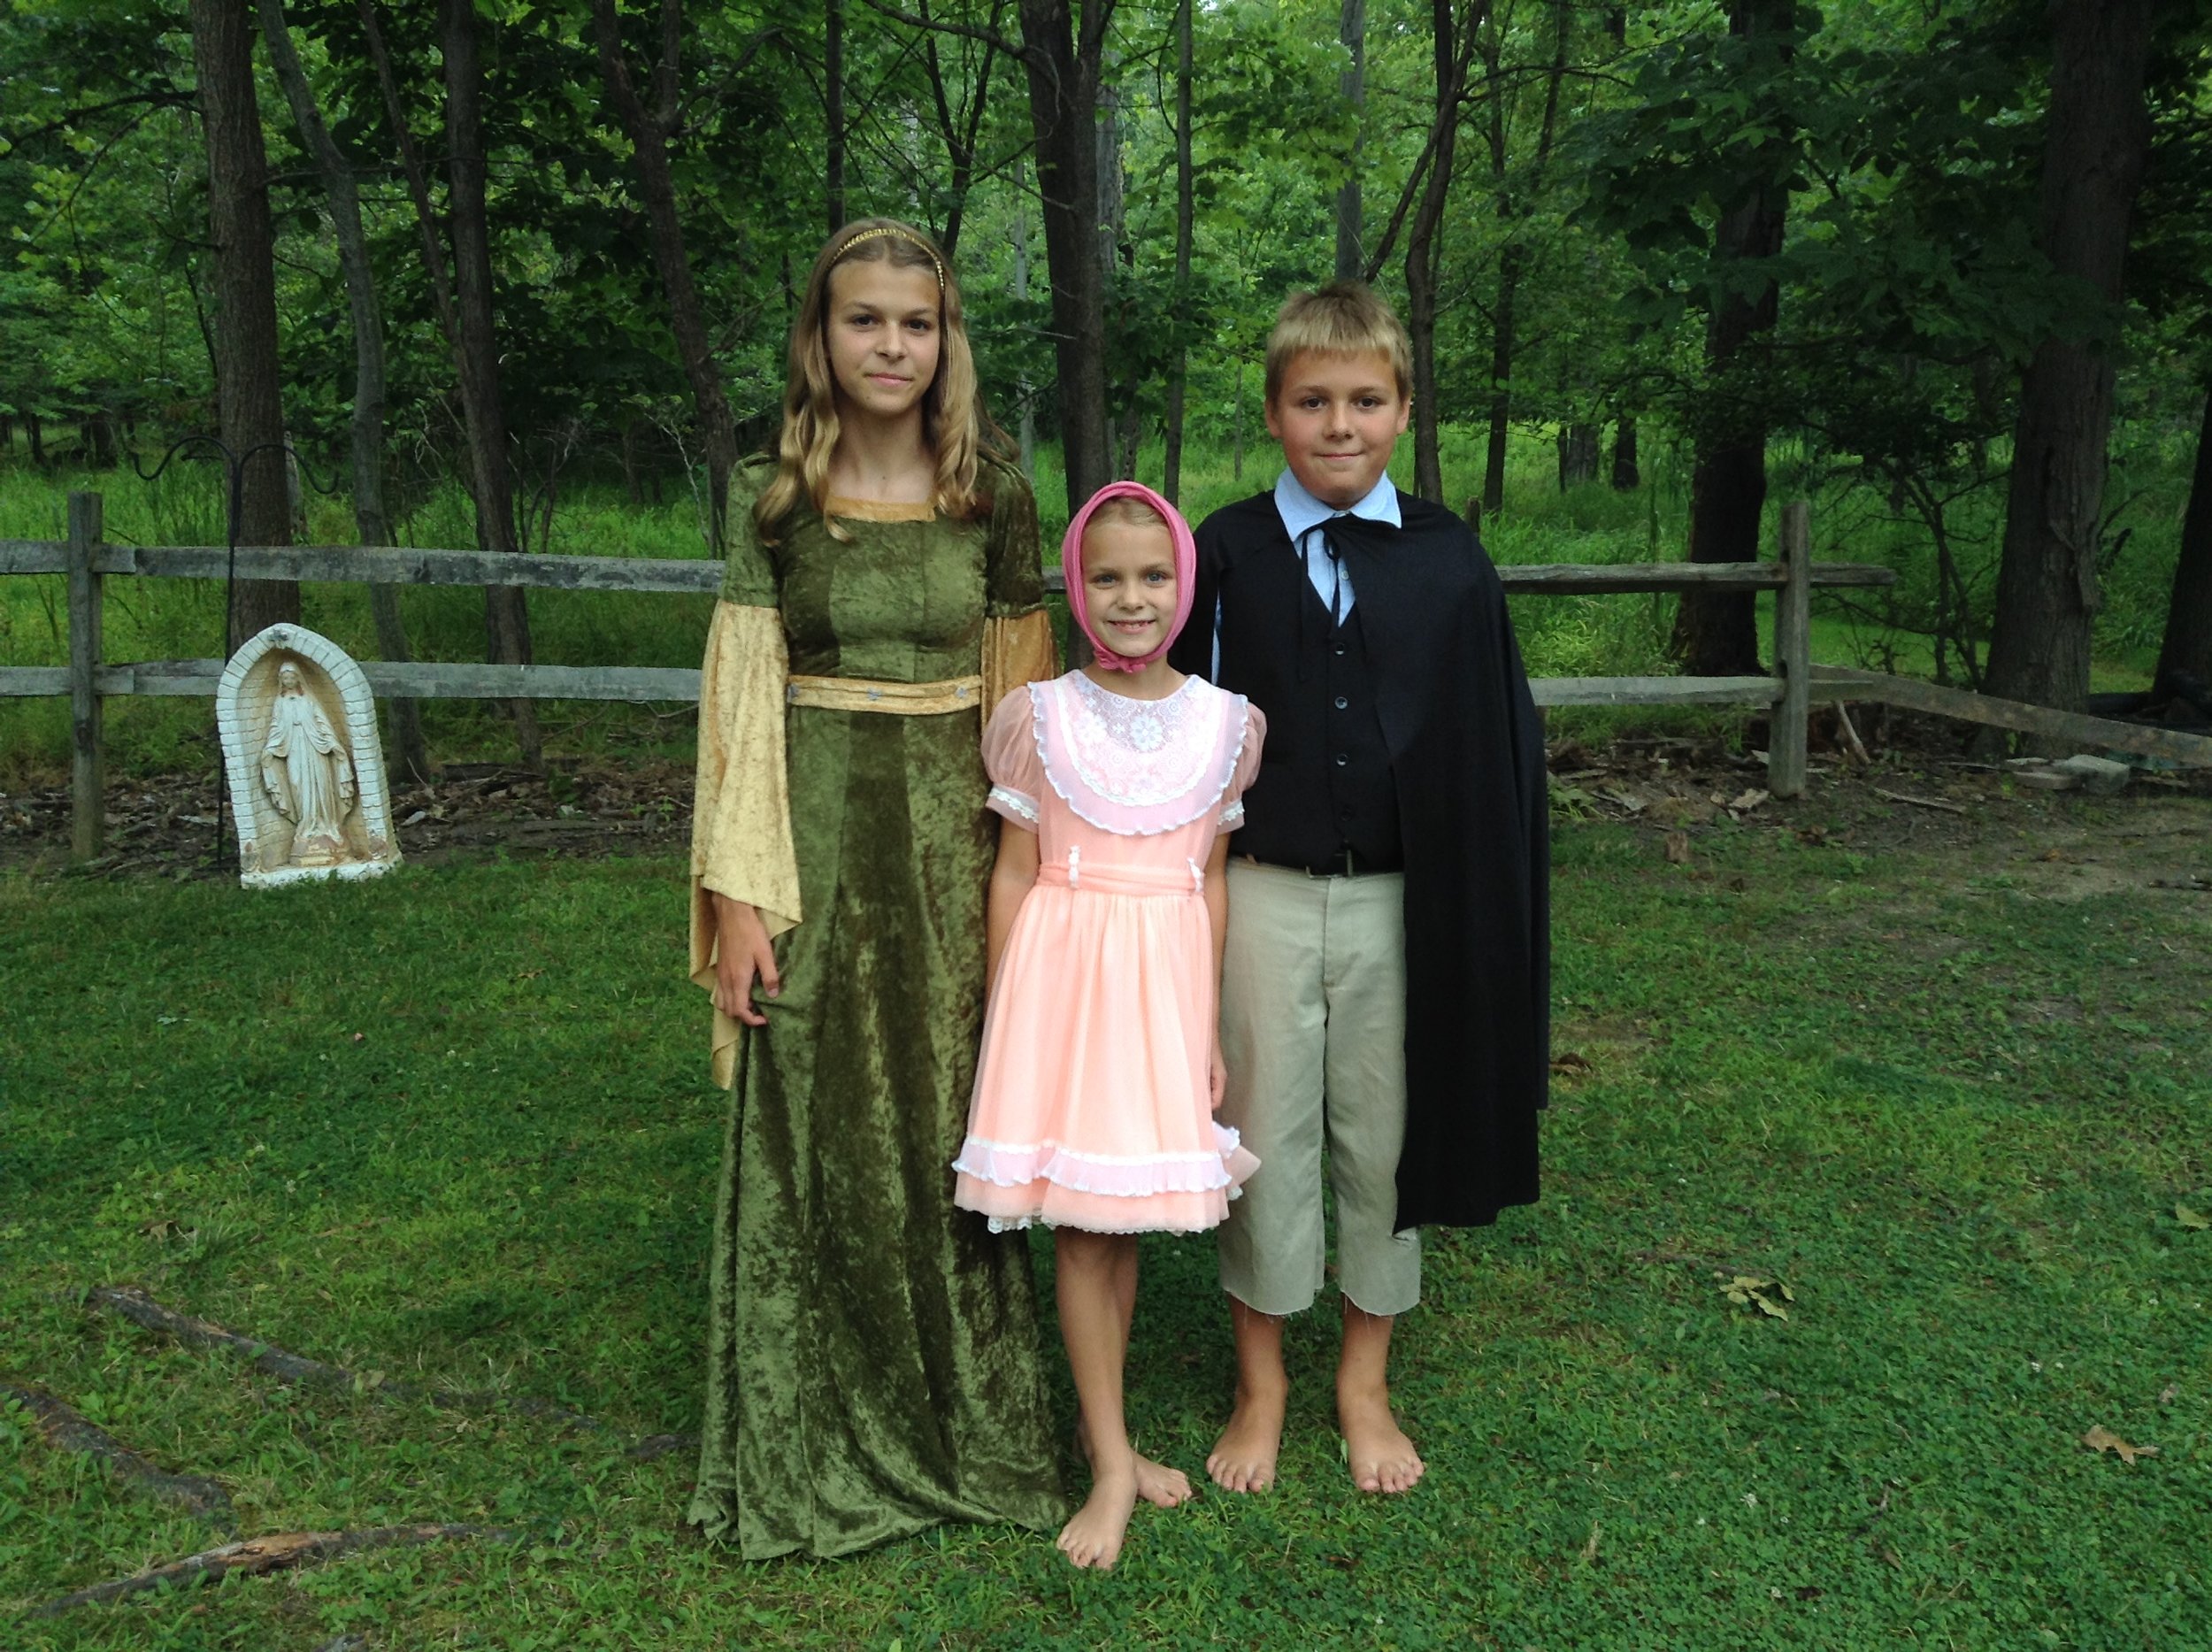
EOWYN

image.png

I had great plans for making this costume from scratch but relieved and delighted when we came across a $5 costume at a garage sale. It was a medium women's gown but I did some heavy last minute costume editing and we made it work. The head piece came with the dress. We washed, parted, and braided Button's hair the night before to get the waves. 
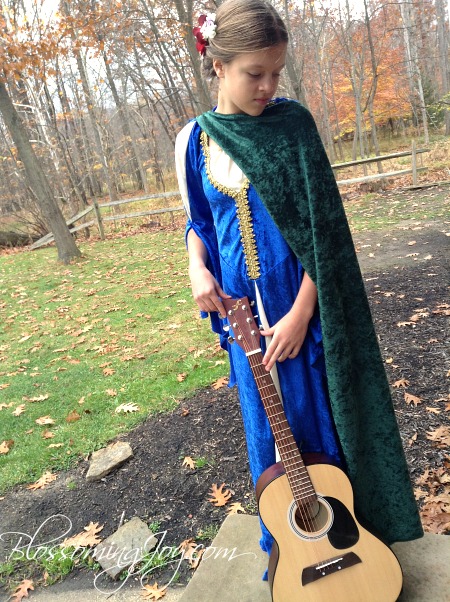
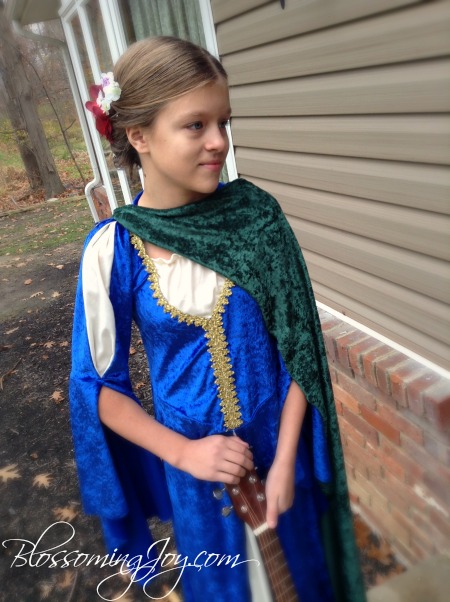

ARWEN

image.png
image.png

I picked up a gorgeous silver embroidered formal gown for $7 at a resale shop many months ago with this party in mind. It was perfect for Cookie and the embroidery was remarkably similar to the Evenstar necklace which I found on Amazon. The cape was a cream colored crushed velvet. No sewing involved. We just tied the ends of a large rectangle (in a last minute attempt at a little more modesty) and it perfectly completed the outfit.
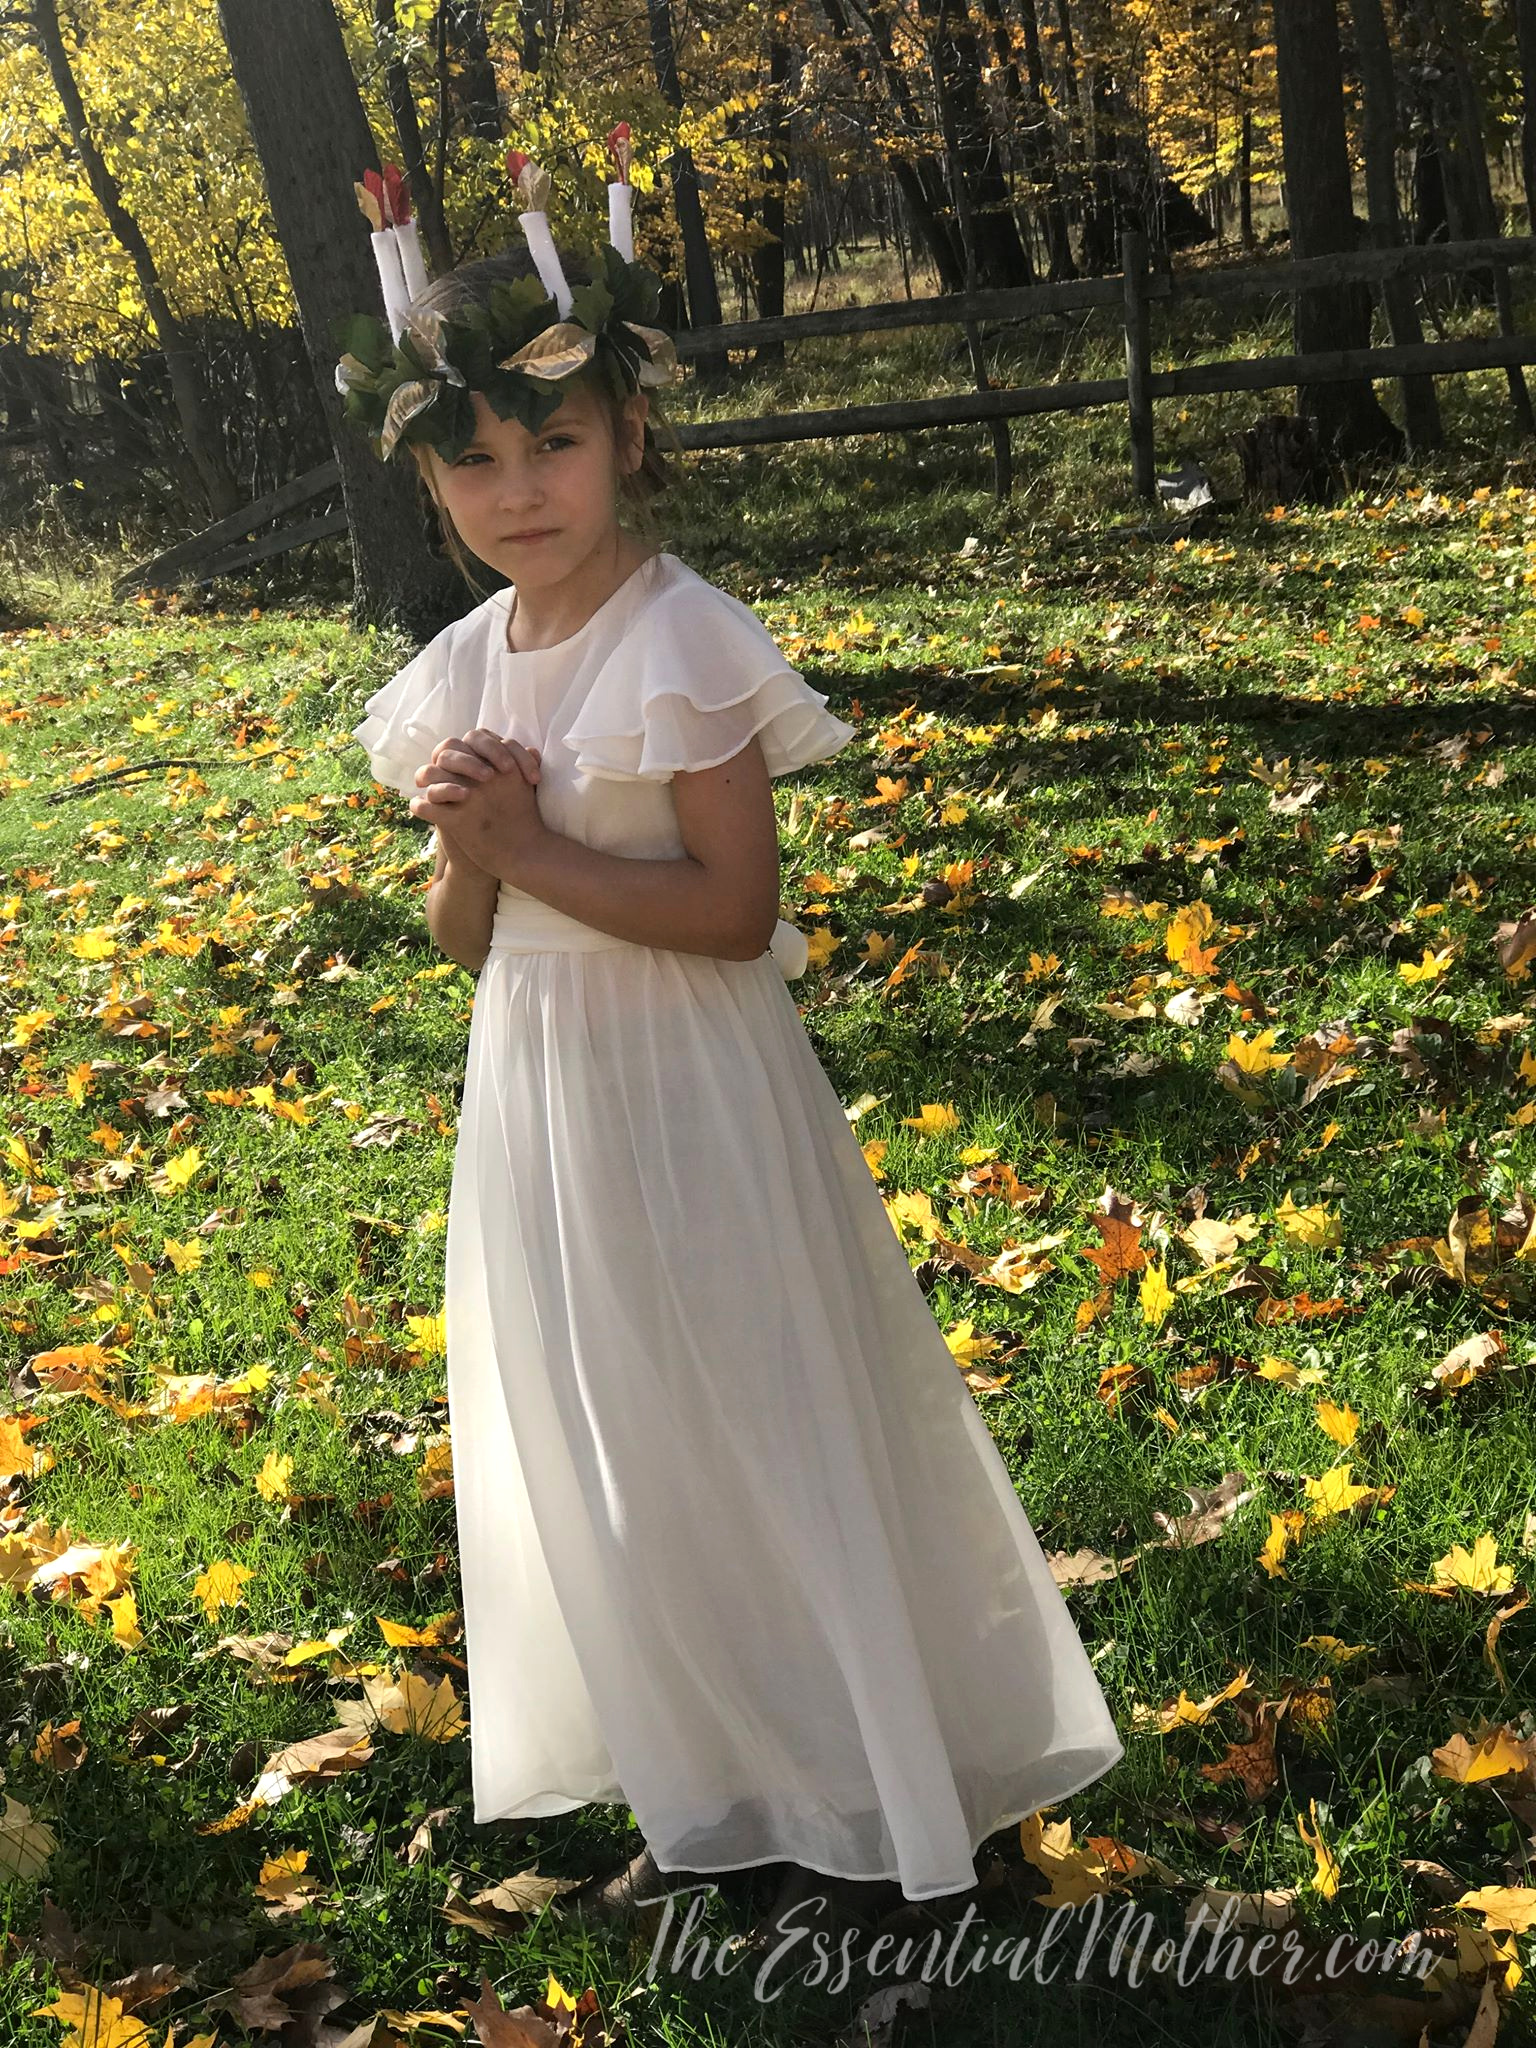
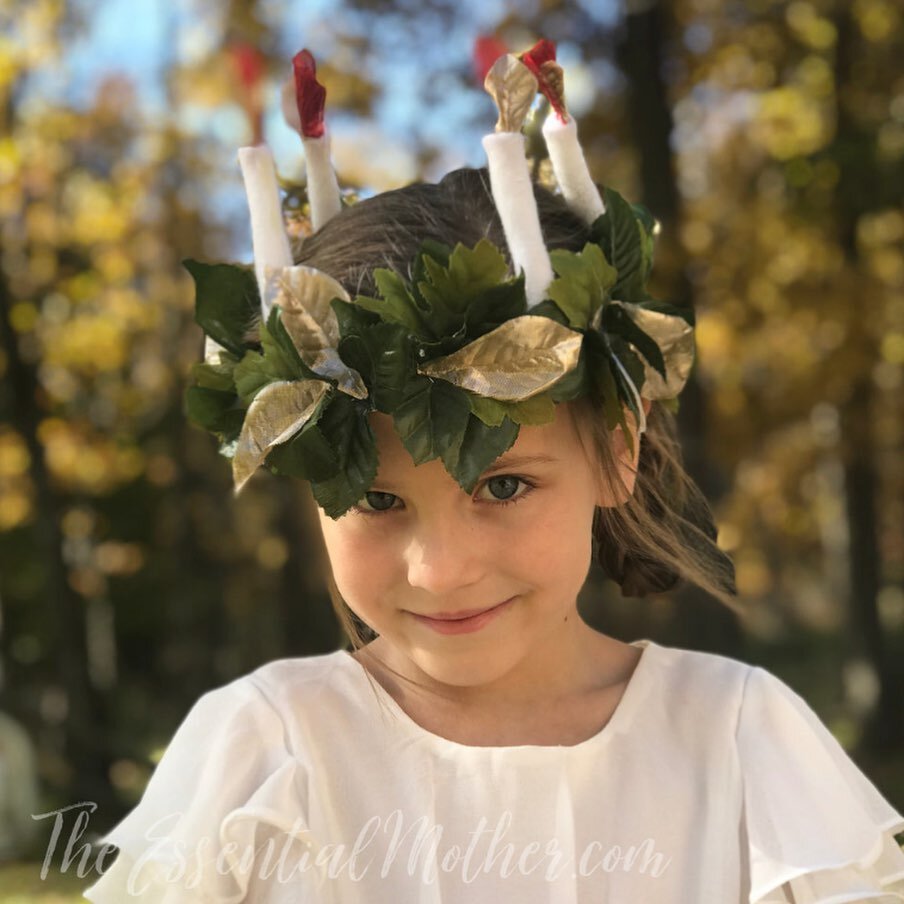

GALADRIEL

image.png

Again, I had wonderful plans for a fully handcrafted gown but was saved by a last minute discovery. A few years ago, I picked up a $3 First Communion gown at a going-out-of-business sale and in a desperate closet search for something (anything!) that would prevent me from having to sew all night, I found it. I added a glittery blue sash and a silver cape and topped it off with a handmade crown.


GALADRIEL'S CROWN

I'm rather pleased with the way the crown turned out. I used a soft and thick florist wire (found at Joann Fabrics) to fashion it since it is so flexible and forgiving. I started by measuring her head and making one loop of the wire to fit. Then I added a second, making the twists and turns I wanted as I went. (Yes, this was hastily done.) We found a beautiful glass bead and affixed it with jewelry wire and then I took a hammer and lightly tapped the front wire to flatten it and secure it. Doing this too hard will break your wire so take care if you try it yourself. The back of the crown is secured by curving and hooking the ends. Nothing fancy.

LOTR crown.jpg
image.png

We fixed her hair by washing, parting and braiding (many little tiny braids) her hair the night before. We simply brushed it out shortly before the party.
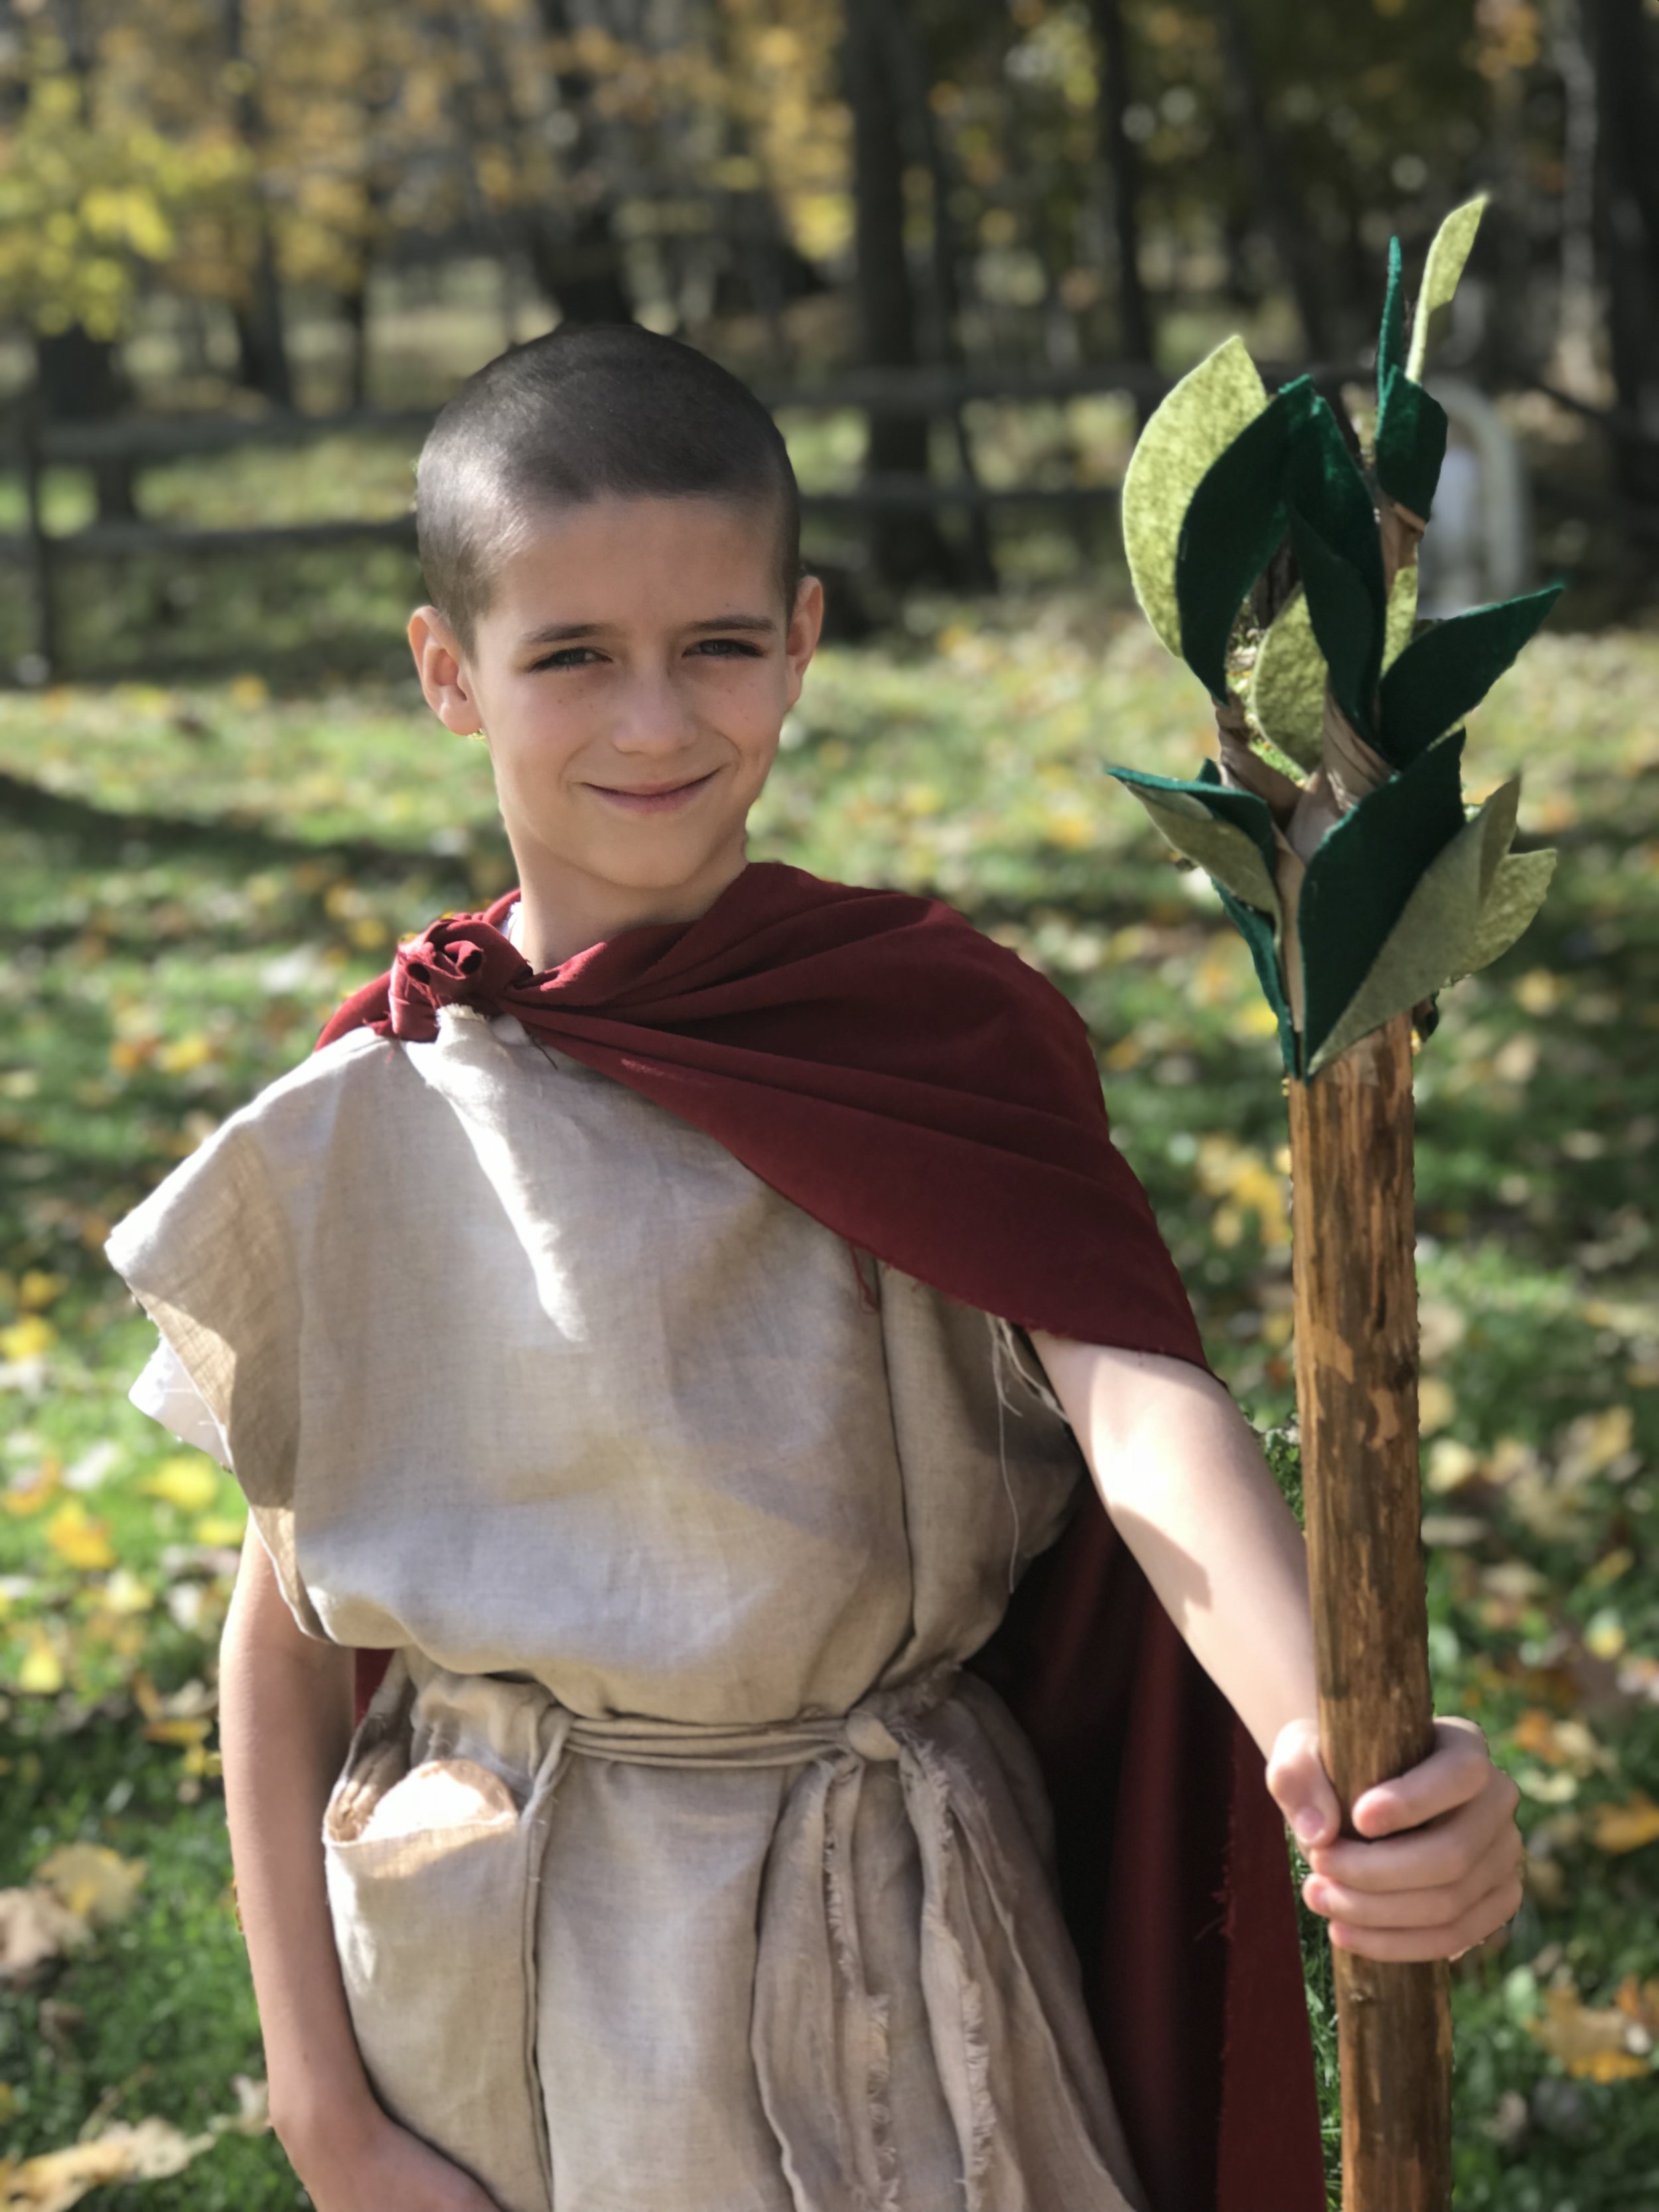
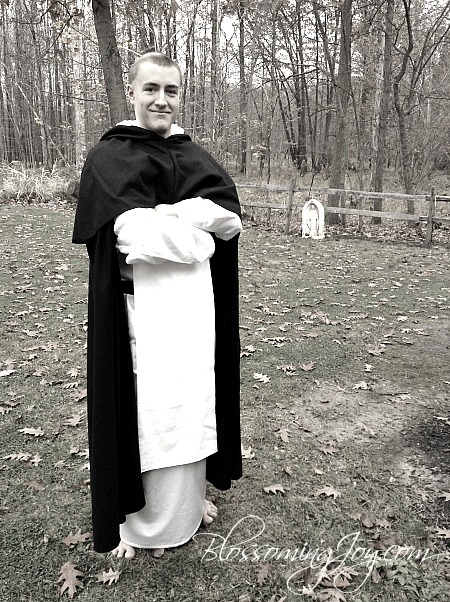

FRODO AND ARAGORN

image.png

Here is the birthday boy (Crash aka Aragorn) and his little brother. I love this picture. Cub actually looks like a little hobbit under Aragorn's protective presence. 
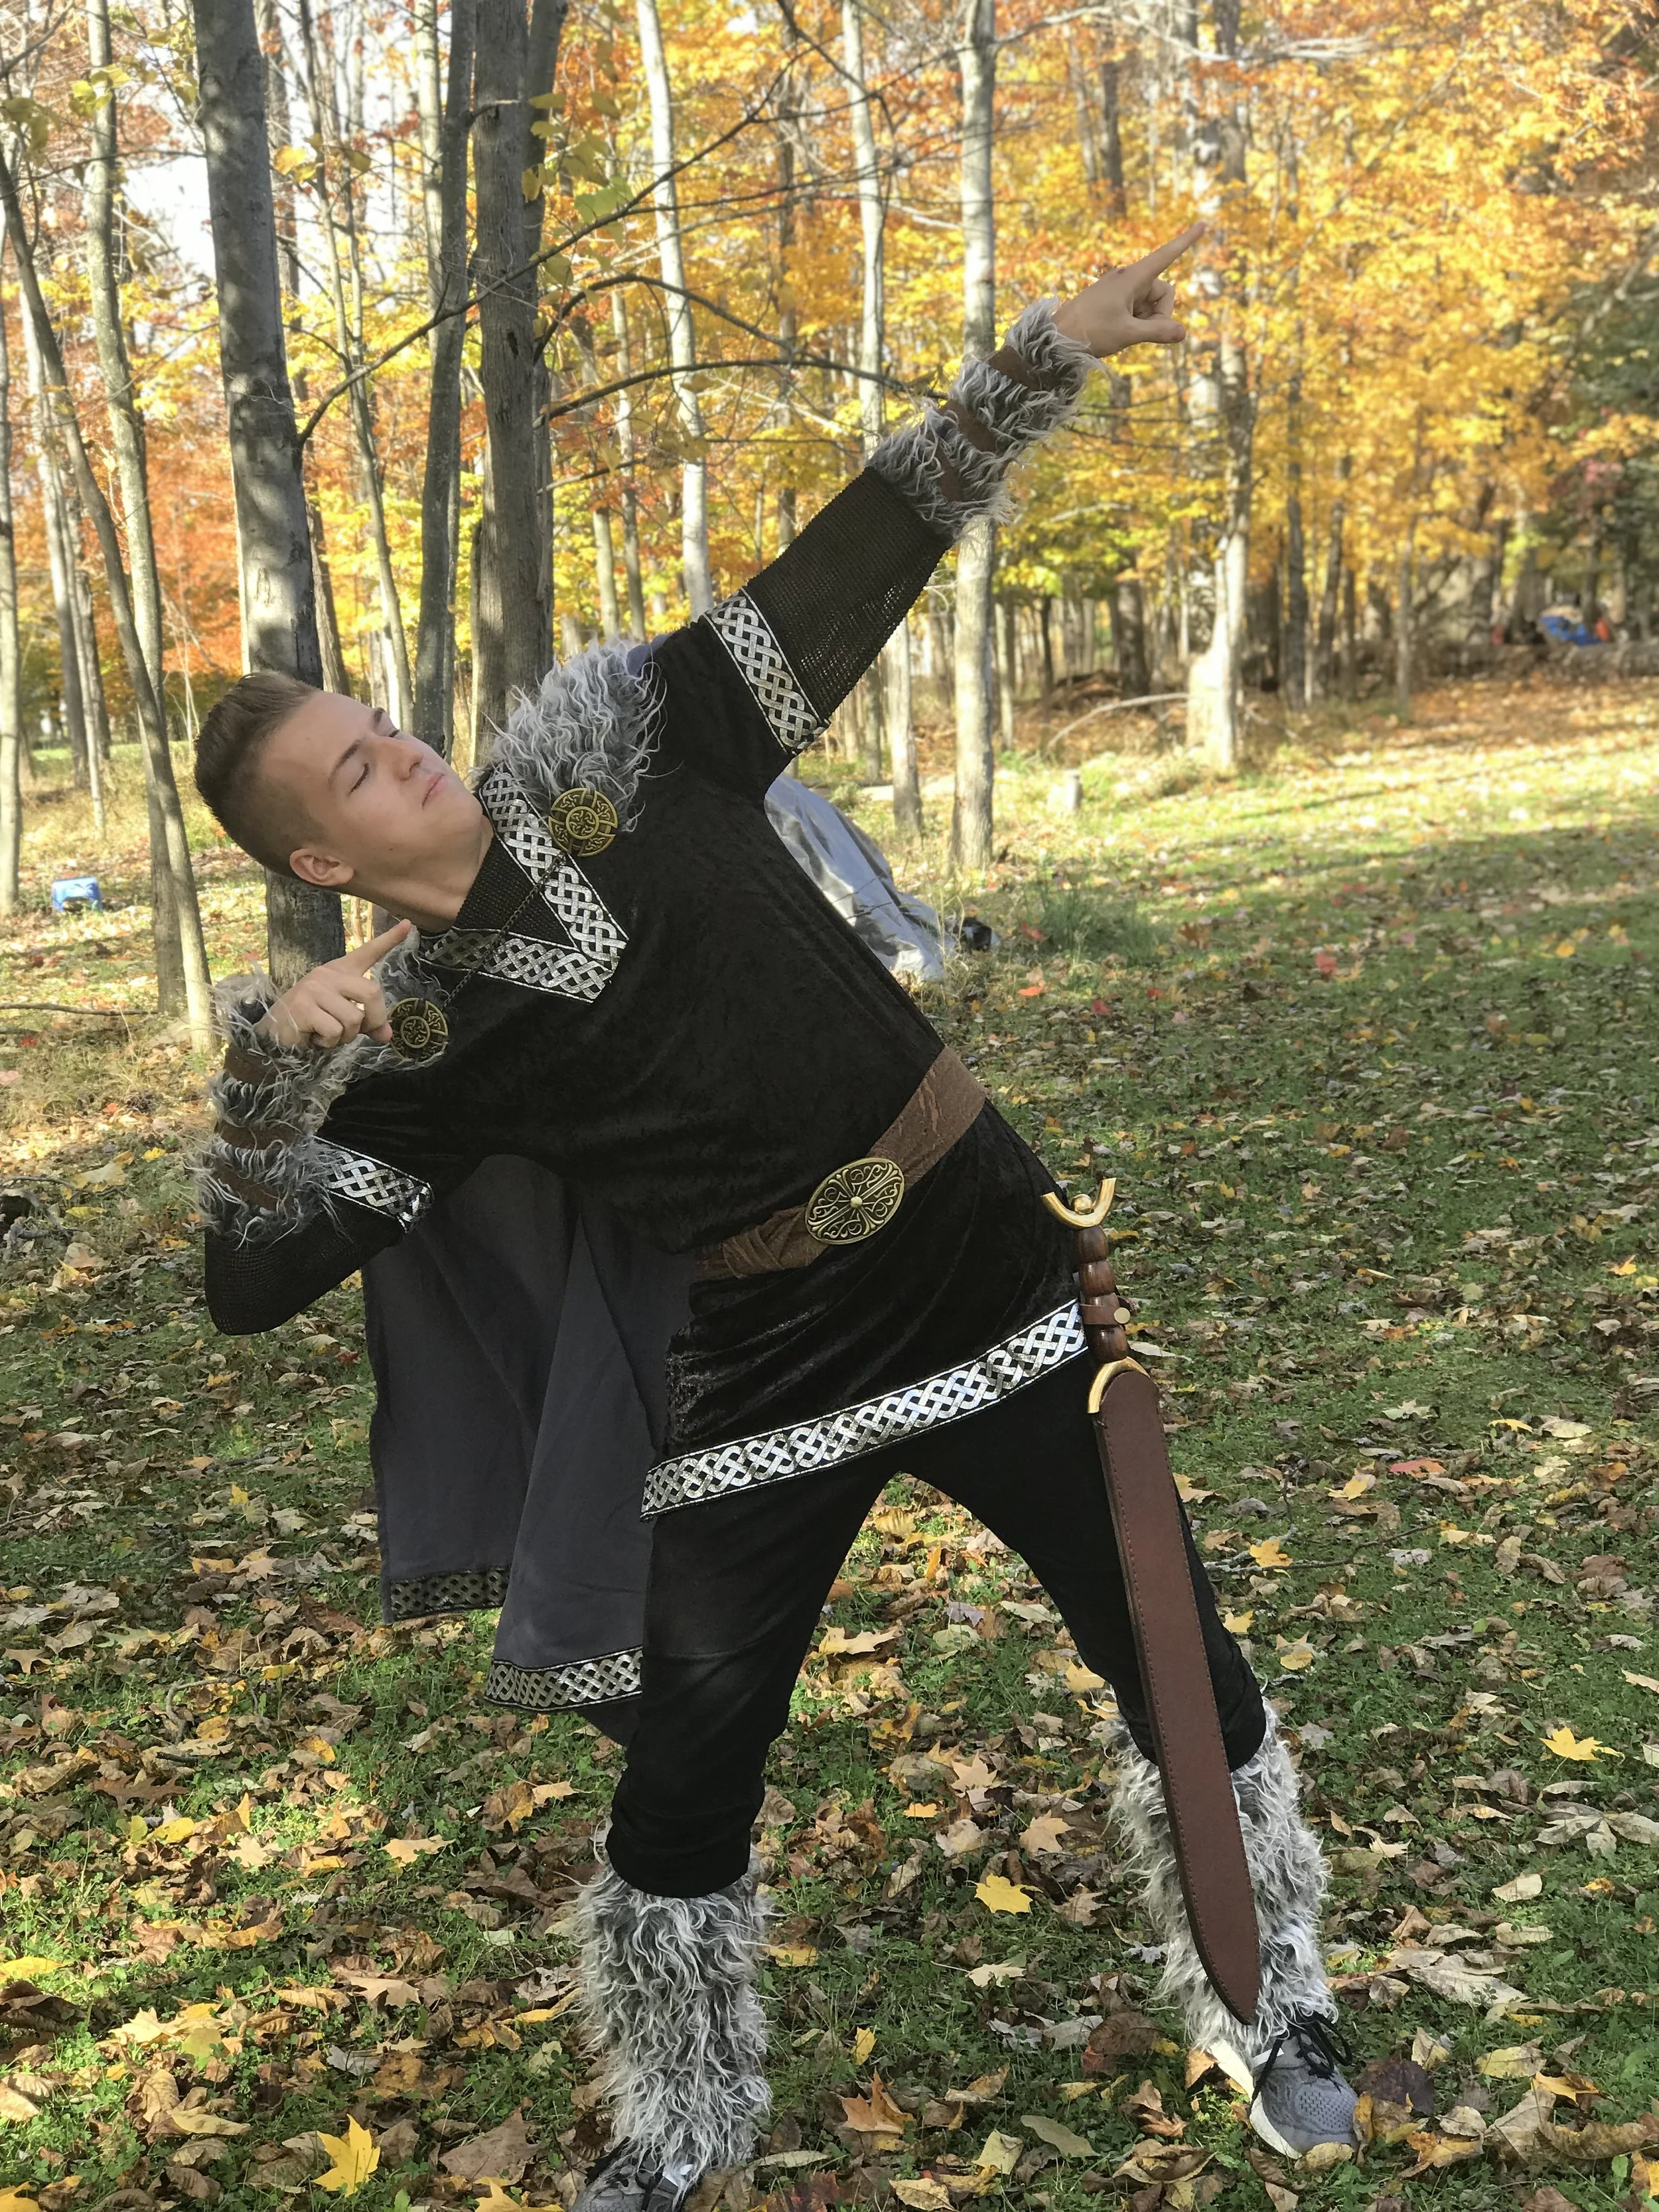

ARAGORN

image.png

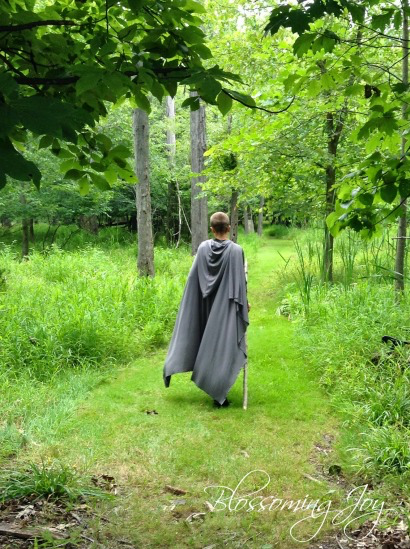
Crash found most of his outfit the morning of the party (we know how to make things exciting) at the local thrift shop...

  • Pants and shirt: Thrifted.

  • Boots: Hand-me-downs from a relative. 

  • Cape: Made by me from a heavy grey stretch knit. 

  • Sword: He purchased this Medieval Broadsword with his own snow shoveling money. It was smaller than he thought it would be but other wise has been very pleased with it.

  • Elf Stone: Crash crafted this (to be worn either around the neck or on the forehead) from costume jewelry and a decorative glass stone (both found around the house). 

  • Leaf Brooch: Amazon for a couple bucks. I have looked since and the price has doubled but you know Amazon... up and down. It was pretty cheaply made but perfect for the job.

  • Staff: Made by Crash

Aragorn costume.jpg

FRODO

image.png
  • Full outfit: This Frodo costume was the only costume that we flat out purchased. I had Amazon credits from the blog (thank you to all who purchased through my links!) and it worked out. Not super duper high quality but complete and perfect for the purpose. Adorable, in fact.

  • Dagger: In addition to the costume, Cub had his dagger (Sting) which was purchased for him as a gift from Alejandro's shop the year before.

  • Pipe: Handcrafted by Crash 
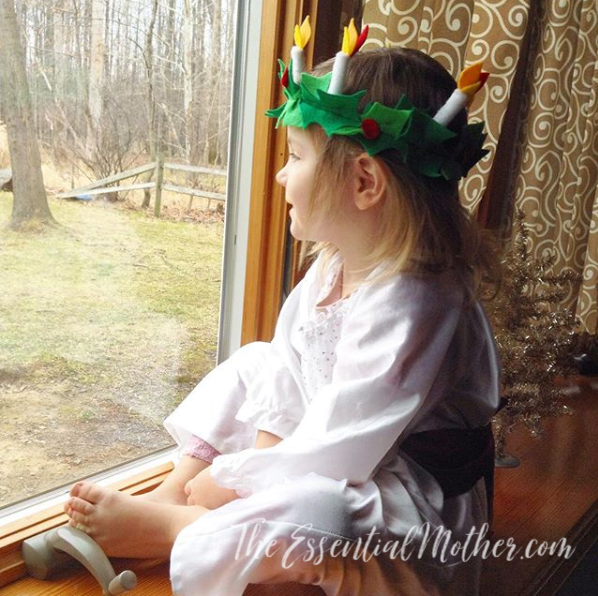

ELANOR

image.png

Okay, so this was a bit of a cheat. We just stuck a pretty dress on the baby and called her Baby Elanor. Here she is being given a balloon by Rosie Cotton.

image.png
IMG_2294.2014-07-26_211251.JPG

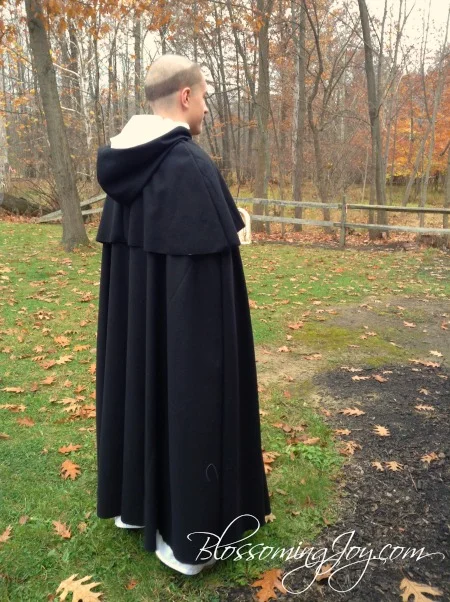
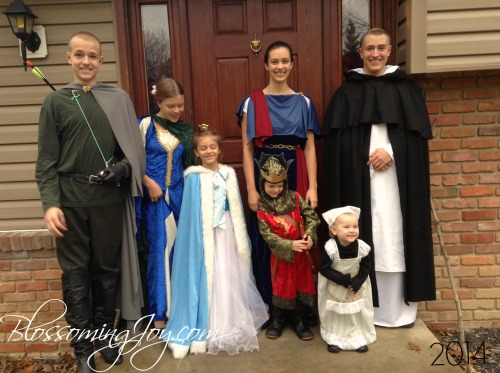
Group shot of all who attended in costume. I've already identified most of mine but see if you can find cousins Goldberry (can you believe she made the dress herself!!) and Samwise. The guy in the suit is mine but he decided that putting together a Gandalf costume was a bit over his budget so he was our self-appointed sommelier...


On to the party details, the first of which is a major cake fail which worked out in the end...
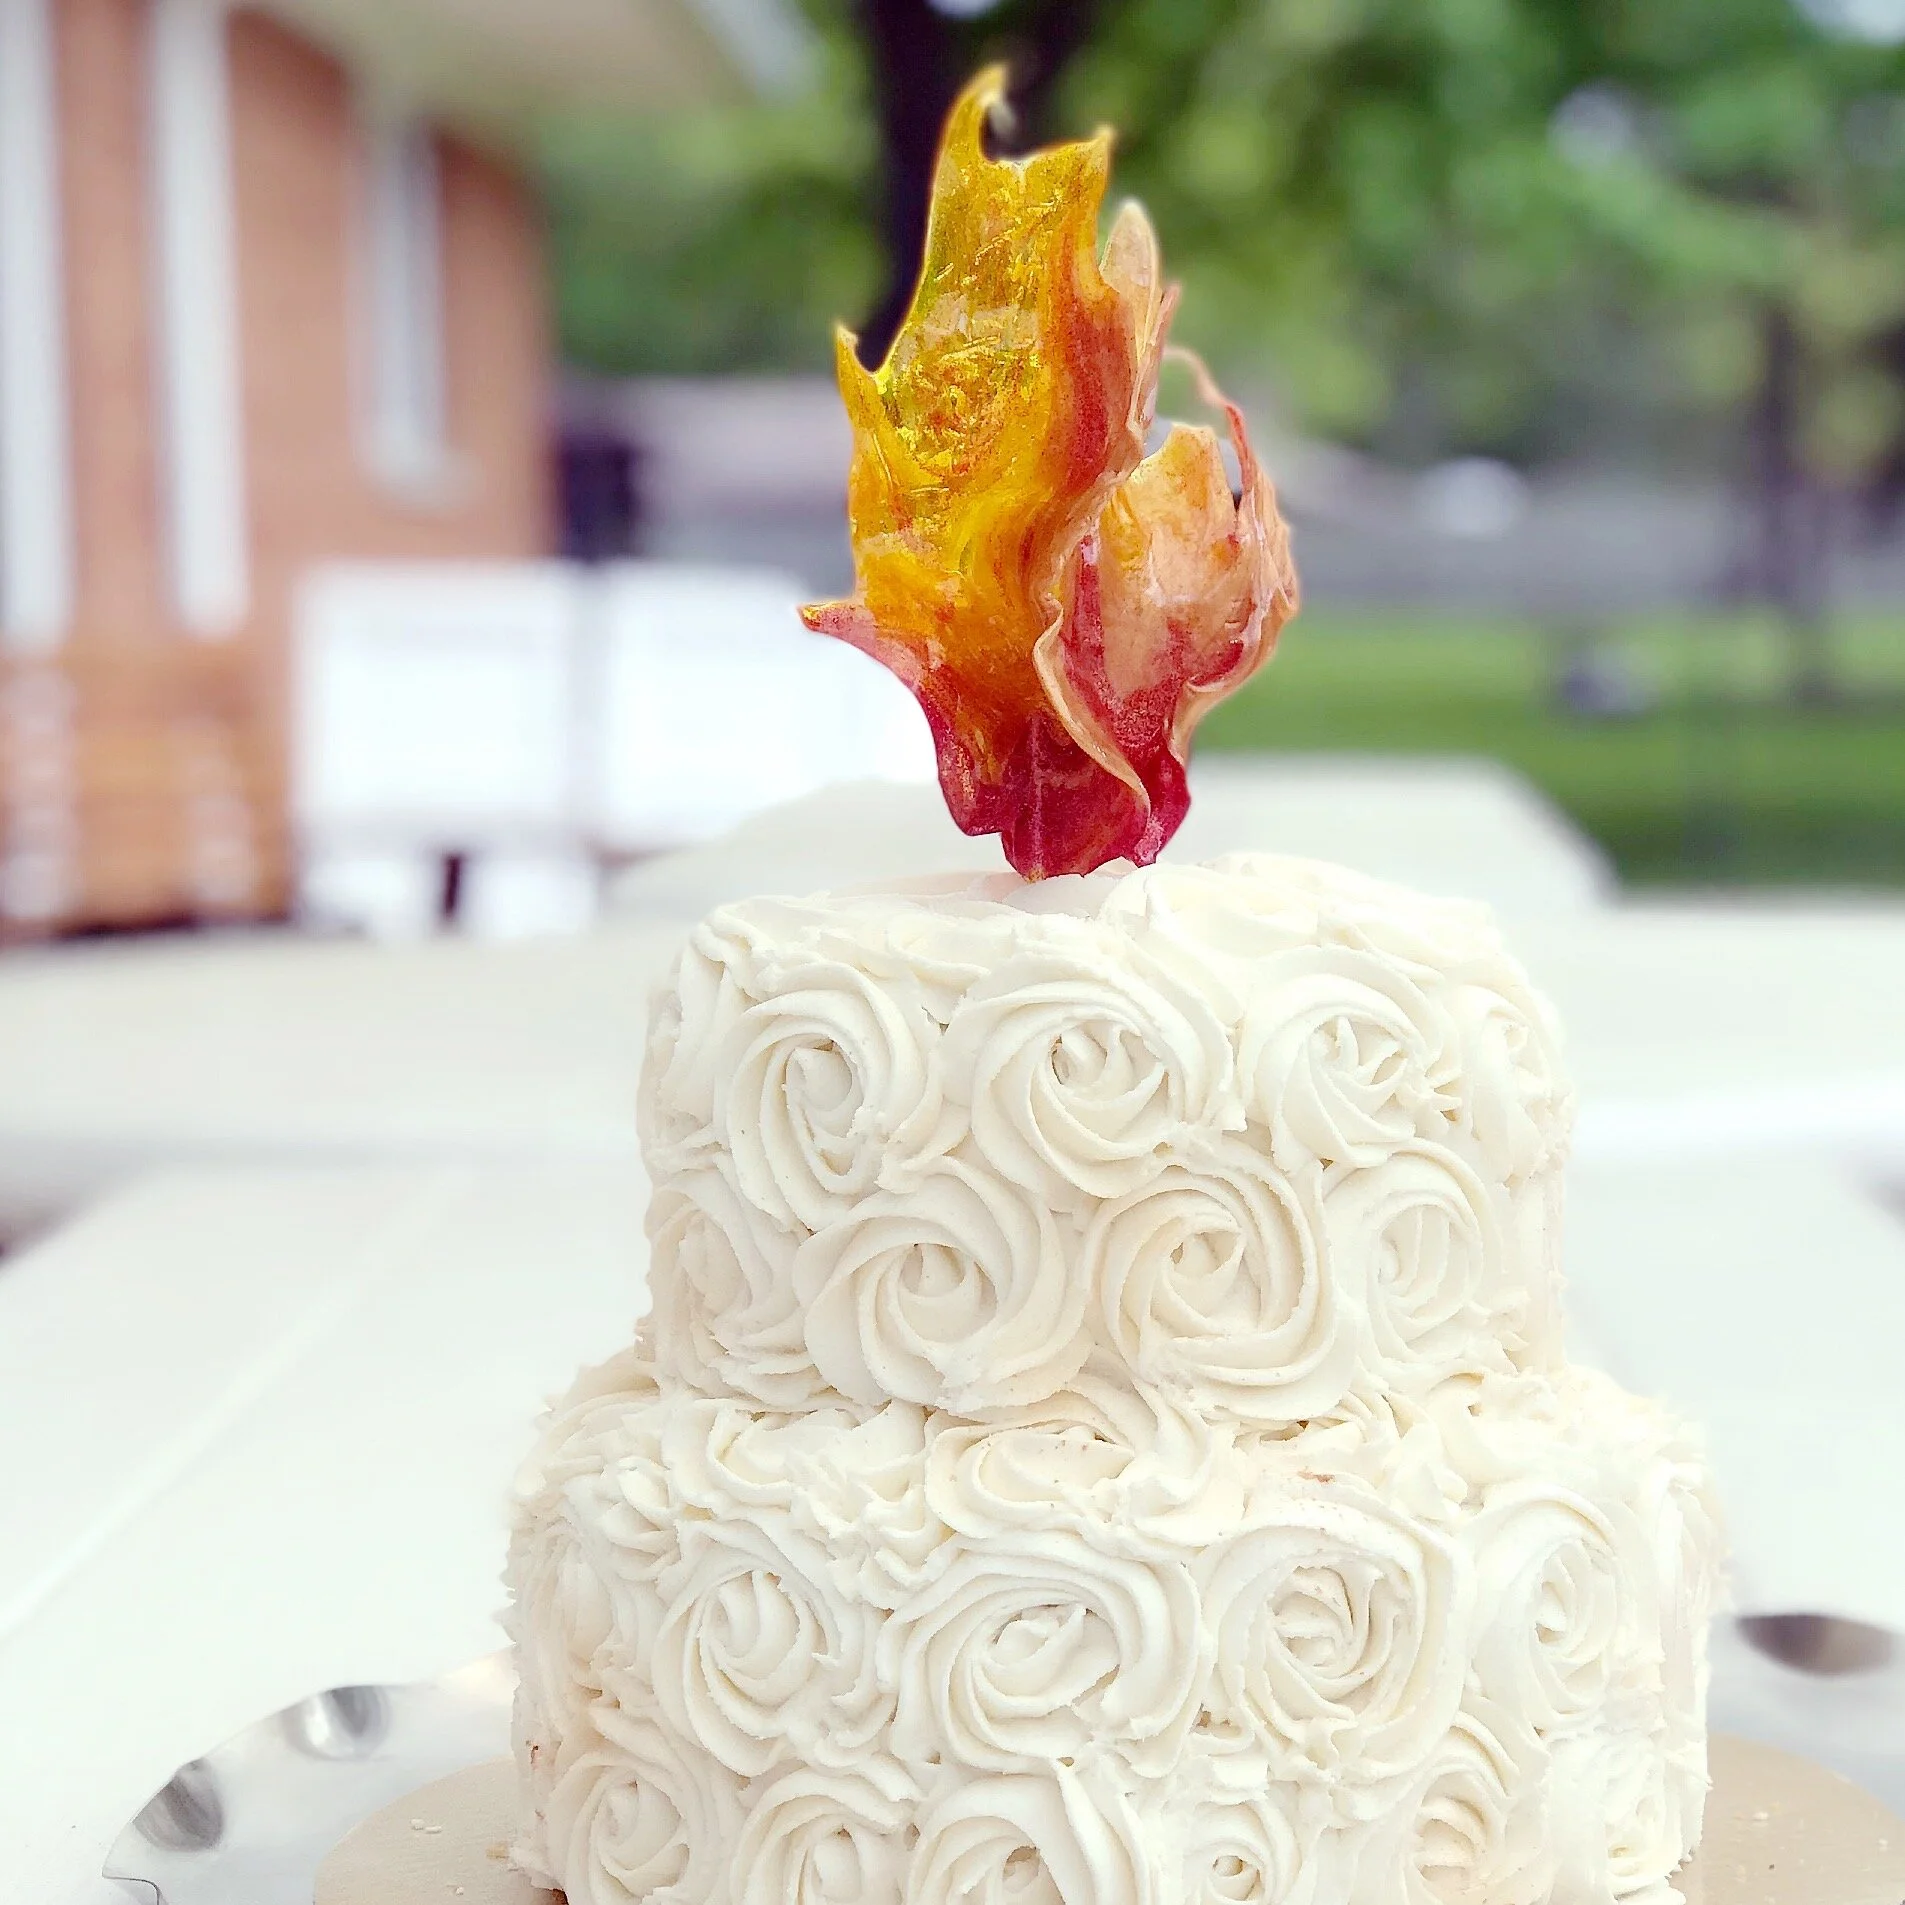
This is Mount Doom. 

image.png

I was running low on time and originally trashed the idea of a theme cake. I'll be glad if I can crank out any cake at all is what I was really thinking. So I picked up three boxes of gluten free brownie mix and planned a layered brownie cake, not recalling that gluten free brownies do not hold together well. So I made three layers in a round spring form and they all fell completely apart. So I transformed the mess into Mount Doom. Added some color by adding food dye to powdered sugar glaze and drizzling along with chocolate like flowing lava. Then I added three tall red candles found in a drawer and some sparklers... and end up with something close to success.

Don't let the small size fool you. That baby was rock solid brownie. (Thank you, Hannah, for lending your carving skills!) And delicious. Here is the “before picture just to keep things real. This is often what my party prep looks like and am happy to say that I’m a relatively adaptable person.

mount doom cake.jpg

EYE OF SAURON

image.png

It is so fun when we get to smash the bad guy. And really, the only pinata I know how to make is a balloon shaped one... so the Eye of Sauron it was! 

image.png

Directions: 

Blow up a large balloon, apply newspaper and glue mixture according to internet directions, apply paint until it sort of resembles the look you're going for. I’m being intentionally vague because I found the process a little tricky and mine started to shrivel… and I don’t really know how to do a better job. So I leave you to the internet!

When you’re done, stuff them with…

Gollum’s Goodies:

The pinata was filled with treats I was very proud of but that were inhaled before I could take a picture. I printed out labels that said: “GOLLUM'S GOODIES” and stuck them on individual bags filled with gummy worms and swedish fish. They were adorable but the kids were only concerned with the candy, not the crafty awesomeness. Someday, they will have their own Pinterest accounts and they will understand the offense given.


INVITATIONS

The invites were nothing complicated. Just some inexpensive parchment colored paper with a black and white map (found on the internet) printed on one side and the party details on the other. We used a free LOTR font found on the internet. Of course, the edges had to be singed because boys always need a reason to play with matches…

LOTR invite.jpg
LOTR map.jpg

The text read:

You are hereby requested to join

INSERT NAME
a.k.a Aragorn

and the Fellowship of the Ring
on a noble quest to celebrate
his 12th birthday

Insert Date
Insert Time
at the shire
Insert Location
middle earth

second breakfast will be served
(middle earth attire is welcome but not required)

Please RSVP…
etc. etc. etc.


PARTY GIFTS AND FAVORS

image.png
image.png

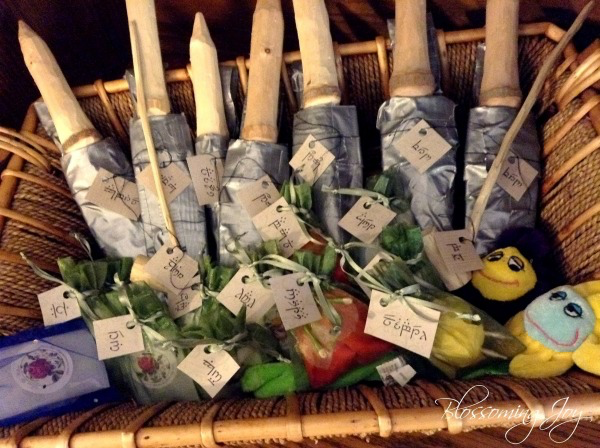
As any LOTR fan knows, Hobbits give gifts on their birthdays. Aragorn is a clear fan of Hobbits and so we went to town putting some special things together for his guests.

Everyone received a handcrafted gift labeled in Elvish. (Instructions for writing and reading HERE) Once they decoded their name, they were able to have their gift...

*Handcarved daggers, staffs, and pipes.

These were all made by Crash. It took him many blisters and weeks to work through them, but it was worth it. The sheaths were made out of duct tape and cardboard and have a loop to be worn on a belt. I’m sorry that I didn’t get a photo of the knives out of their sheaths but hope to unearth a pic and add it soon.

Hobbit birthday gifts.jpg

*Handmade fairy dolls
I love making these little dolls and we whipped up some woodland lovelies for the girl guests.

Fairy doll.jpg

*Handcrafted flower jewelry
My daughter made glass pendants using real pressed flowers and these were given to the ladies.

*Favor Boxes contained: 

A ring pop and homemade green "glass" candy (supposed to remind people of the Elfstone)
The boxes were from the Martha Stewart wedding collection. Pricey from the store but I found them brand new in the package for a song at a thrift shop.

image.png

LEMBAS

image.png

I had great plans for the lembas. I was going to come up with a great GF recipe and cut leaf shapes out of fabric. But time just flew by and rice krispy treats and green napkins ended up working out just fine.


DECORATIONS

image.png
image.png

My original plans included decorating various areas to look like different LOTR locations. I wanted a Lothlorien and Shelob's Lair and a Prancing Pony. We simplified out of necessity. This Prancing Pony sign was a must though and I hung it in the kitchen area.

To make the sign I used foam core poster board as the base. I sketched a pony on a separate piece of regular poster board. I googled images and chose my favorite one and eyeballed it. Then I cut out the pony and glued it to the foam core. (That effort was largely to avoid messing up the more expensive foam core but it ended up "popping" in a cool way.) After that, I got out all my paints and used what I had to make it decent. I had no brown and ended up using gold and black for the wood. You can't really tell from the picture but I thought the shimmery effect was nice. 

Prancing Pony.jpg

GAMES

We borrowed white lights and hung them in a couple places. And then we created a party room where we set up a "speech table." The picture is so-so because I don't have a flash but it gives the general idea...


image.png

The Party Speech game

This is a Hobbit-ish version of the classic Toastmasters 60-second speech exercise. Rules:

1. Everyone writes down a word on a small piece of paper. Any word at all.

2. All words are folded up and placed in a jar.

3. Participants choose a word randomly from the jar. Words written down included words like “grapes” and “philosophy.”

4. The speaker must then give a 60-second speech. The speech must include the word on the paper plus a reference to the birthday or the birthday boy.

I wish we would have recorded some of them. 

Elvish Name Game

I already mentioned this but we had people translate their names from elvish to identify their gifts (pictured in the guest gift pics above). If we had more time, we would have had people try their hand at writing.


GIFTS RECEIVED

I had to stick this in here because Crash really did receive some fun and creative gifts which I highly recommend for 12-year old boys:

Lord of the Rings Risk

Lord of the Rings Pez 

Wood burning kit

Wood carving Kit

Protective Kevlar Gloves (Yes. Get these. You can avoid a trip to the ER and nauseous mother. I speak from experience)

Whittling Book

Tac Force Folding Knife


WHY WE LOVE LORD OF THE RINGS

We love the fantasy world of Tolkien but we also make sure that the kids are aware of the deeper thees of the books and the Catholic ideas woven tightly throughout. Fantasy for its own sake can be problematic for a young mind (that is a much larger discussion)… but if it has a deeper Christ-oriented to which to point, fantasy can be an excellent source of delight and good formation throughout life.

Lord of the Rings falls into this category in our household and we do our best to make sure that it is read in a proper context. For the older children (or as soon as they are able), we encourage the lectures and writings of Joseph Pearce who brilliantly expounds on these ideas. There are also a few other works that we recommend and enjoy.


Originally published in August 2014

DIY Saint Lucia Crown and Costume (Beginner and Intermediate Tutorials)

St. Lucy Banner.png

Since St. Lucy is the patroness of one of our little girls, we’ve had the opportunity to DIY a couple versions of Lucia and her crown over the last few years. The first version was for our girl when she was about 2 years old and could be considered a beginner tutorial using mostly felt.

The second was when she was 5 and requires a little more patience with artificial flowers, leaves, felt, and stretch lace. However, both crowns are relatively easy and can be used for younger or older girls.

Both are perfect for All Saints’ Day costumes, saint reports for school or church, and of course, for the Feast of St. Lucy on December 13th. (Find some lovely ideas for celebrating St. Lucia’s Day at Shower of Roses)


One note about my tutorials…
I'm the kind of crafter who fiddles with something just until it looks right and then sticks it together with whatever works.  Consequently, my tutorials are perhaps more vague than some prefer. So... up front... I don't have any more details than what I’ve written. This is it! And I still think that you can do it. Yours will probably look different than mine and that's completely fine. That’s actually how it should be. Carry on! 


SAINT LUCY CROWN AND GOWN (#1 Beginner Felt)

I initially made this crown while stuck on the couch with pregnancy nausea. Ah, memories! Working for two minutes, pausing to let the waves pass, cutting, stitching, nausea, using some Christmas felt that I already owned... but it worked out nicely.

I didn't use a pattern at the time, just cut and hoped for the best. When a friend asked me to share a tutorial, I said "sure!" That was 3 years ago now… I’m a little slow… but better late than never!

WHAT YOU NEED FOR THE CROWN:

  • One strip of green felt, 3/4"-2" wide and as long as the circumference of the child's head. (you can find felt-by-the-yard at your local fabric store)

  • One 2" piece of soft elastic. I used folded over stretch lace similar to THIS. FOE (fold over elastic) is also a great soft option.

  • 15-25 green felt holly leaves. Mine has 17 but I might have made it fuller if I had more time and less nausea. I divided the leaves between two shades of green to give more dimension and also used 4 different sizes of leaves. A template is below for those who need it. Drag and drop into a document and adjust the size to your liking. (Aren’t you just bowled over by my tech brilliance?) I cut mine freehand because I had no patience for tracing and cutting along lines.

  • Red felt for Berries. Cut however many you want from red felt. I used 5 but could certainly have used more. 

  • White felt for candles. I used five because my girl had a toddler sized head but you can use as many as you like. I used 2" x 3" squares of white felt. Most felt tutorials I have seen have flat felt candles and I wanted mine to be a bit rounder. So I designed these to roll up. You can make these taller or fatter if your child is older or if you just want bigger candles!

  • Flames. Red, orange, and yellow felt flames for each candle. You don't have to use those colors. I wanted to give a bit more of a dimensional feel to mine so I varied the sizes and colors. 

  • Thread or hot glue (or both). IMPORTANT: You can glue this instead of sewing it. Glue is a wonderful tool for getting things to stay put and works great on felt. However, the last step that I used was a running stitch straight through the length of the headband to reinforce strength and secure everything. You will NOT be able to do that step if you have hot glued everything. That is because you will break your needle and jam your machine! So just choose your path ahead of time.

WHAT YOU NEED FOR THE DRESS:

  • A white dress or tunic of any kind. This one was a castoff from an angel costume over a white turtleneck. I bought it off a local family for $5.

  • A red sash. If you want. It’s not strictly necessary. The white of the dress represents purity and the red sash the blood of martyrdom. You can use a strip of satin like I did or any fabric at all. A red scarf or ribbon might also work.

St. Lucy Costume 1.png

HOW TO MAKE THE FELT CROWN


1. HEADBAND

I started with a simple strip of green felt for the headband. The width can be as wide as you like but mine was about 3/4" since I didn't want any of it showing past the leaves (I’m particular like that) and because her head was small. Measure your child's head around where you want the crown to sit. Use that measurement as the length.

Cut a two-inch strip of soft elastic (FOE, folded over stretch lace, or whatever you have on hand). 

You will be attaching the ends of the felt together with the elastic so this has less to do with measurements than it does how it feels on your child’s head. Pin the elastic when it is at a comfortable place on her head (being careful not to pin her head, of course) so that it stretches enough to be comfortable, but it snug enough to stay put. Stitch in place.


2. LEAVES

I made my leaves to look like holly leaves the ones below. It doesn’t have to be holly but it fits nicely with Advent and is easy to reproduce. I made various sizes and a couple different shades of green.

There really isn’t a way to do this wrong. All of God’s leaves look different in nature and yours will, too. If you want to add extra dimension and fullness to your leaves, you can add the following step:

Fold the leaf in half and machine or hand stitch very close to the folded edge through the middle section of the leaf (indicates by the middle lines in my sketch below). When you unfold it, it will look like the middle vein of a real leaf. If you look closely at my photos, you can see the result.

St. Lucy leaves.png

Hand stitch or hot glue the leaves into place around the headband. I stitched mine.


3. FLAMES

I completely forgot to draw you some little flame templates BUT… I think you can figure it out. You will need one red, one orange, and one yellow flame “petal” for each candle. The shape is roughly a tear drop but with a point at both ends.

If you make each color successively smaller, the individual colors will be more visible. Cut these out and make them ready to attach to the candle pieces (below). You can draw your template first but I just cut them all differently. Have you ever seen two flames alike? Neither have I!

St. Lucy costume 2.png

4. CANDLES

I used five because my girl had a toddler sized head but you can use as many as you like. I cut 2" x 3" squares of white felt. Most felt tutorials I have seen have flat candles and I wanted mine to be a bit rounder and slightly more realistic. So I designed these to roll up into a tube shape. You can make these taller or fatter if your child is older or if you just want bigger candles!

There is no secret sauce to stitching so that these stay in place. Just use white thread and do what you have to do to keep it all together. If you are a gifted sweet, you will know what to do. If not, just put the needle through until it stays.

You can also use hot glue but that will make it difficult or impossible to stitch onto the headband later. In that case, you will have to use hot glue to affix the candles to the headband.

Before you roll the candle up, stitch (or glue) your red, orange, and yellow flames in the middle of each rectangle… right about where the top of the 3 is on the diagram. After you roll up the candle, your flames will be flickering right out of the top.

St. Lucy Candles.png

After the candles are constructed, arrange them around the wreath and stitch them to the inside. The base with flatten somewhat with stitches and then with the next step.


5. SECURE THE CROWN

If you haven’t used hot glue for anything on the headband so far, you can run a straight stitch right through the middle of the crown to make sure that candles, leaves, and band are all secure. The crown will be somewhat floppy when held (the price to pay for a soft and comfy crown) but should perk right up on the head. Almost done… just one more step…

Saintlucycrown.jpg

5. BERRIES

The finishing touch. These are pretty straight forward. Just cut out some circles and glue or stitch them wherever you think they look pretty!

St. Lucy berries.png

And that’s it! If you end up making this crown, I would love to see the fruits of your efforts. Feel free to send along a photo so that I can ooh and aah over your work (and adorable children).


SAINT LUCY CROWN AND GOWN (#2)

St. Lucy crown DIY.jpg

On her 5th All Saints’ Day, she wanted to be St. Lucia again and her old crown was a bit too small. Also (and to be completely honest), I was excited to try my hand at a more mature version using artificial leaves. The challenge this time was that I knew she would never tolerate anything that felt like leaves. It had to be as soft as the felt version or it would end up in my purse.

The crown was a success on all counts. Not only was it simple to pull together (and just as I had pictured it), but it was super soft to wear. In fact, she didn’t take it off even once during the festivities.

Also, this dress was a winner. So modest, soft, and feminine. All the details are below. I give you fair warning… my crown tutorial is loosey goosed. But generally crafty people should be just fine.

WHAT YOU NEED FOR THE CROWN:

  • Artificial flowers and leaves. I keep my eye out for particularly pretty and unique flowers at the Dollar Tree and then I take them apart. We use them for so many projects that the dollar is always well spent.

    I used 4 or 5 different kinds of leaves that I had in my stash plus gold and red metallic leaves that I cut from a bunch of Christmas themed artificial flowers. Use as many as you like. St. Lucia’s crown is traditionally made of evergreen but I never have been one for letting the perfect get in the way of the good so… we use what we have.

  • Stretch Lace. You can also use elastic but I knew this headband had to be the gentlest, softest base possible for my little sensory sensitive kiddo. This 2.25” lace isn’t exactly what I used but it is similar.

    When it isn’t on the head, this crown is super floppy… but it perks right up when it’s worn. The key is to make sure everything is secured with hand stitches in a balanced fashion.

  • White felt for the candles. You will also need small rectangles of felt to secure the candles to the headband. 

  • Needle and thread

  • Hot glue. Most of this crown will be hand-stitched but there will be places where a glue gun will be helpful and appropriate.

St. Lucy Crown 4.jpg

WHAT YOU NEED FOR THE DRESS:

  • An Amazon account. I purchased this dress for about $15 after researching the multitude of Chinese companies which sell it. I finally came across this low price (I found it as high as $70 on ebay!) and made the purchase. We will be repurposing it for Easter by dying it a pastel color. It is thin but so classically beautiful and comfy.

    Prices are constantly fluctuating on Amazon so the best price I have found recently is HERE for $20 with free shipping. You can bargain hunt by searching “girls flutter sleeve chiffon dress”.

  • A red sash. We chose to keep it simple this year but it would be very easy to tie a strip of chiffon or satin around the waist.

  • A note about footwear. My girl wears cowgirl boots with everything. I’m okay with that.

St. Lucy Crown DIY 1.jpg

HOW TO MAKE ST. LUCY’S CROWN


  1. Measure the stretch lace or elastic to fit your girl’s head comfortably yet securely. The stretch lace works best if you double it. You can use two layers of 2” stretch lace or fold over a length of 4”. Stitch cut ends together to form the band.

  2. Choose the leaves and petals you’d like to use for the crown foliage and stitch a first layer onto the elastic. This is a little delicate since stretch lace generally has holes in it and doesn’t tolerate a very tight stitch. This is why this is an intermediate project… because you will need to find that fine line between securely attaching and leaving the stretch intact. You will add a second layer at the end with a glue gun or stitches.

  3. Make your candles using the instructions in the previous tutorial except increase the height of the candles for an older child. These are 4” tall x 3” wide rectangles.

    I only made four candles because that’s all the white felt I had left. It gave the correct general impression so I was content. 

    Instead of felt flames, I used one gold and one metallic red petal layered together. I also used a glue gun to make the candles instead of stitching because the candles will eventually be glued to the headband anyway.

  4. Use a hot glue gun to attach the candles to the OUTSIDE of the stretch elastic... where the leaves are. Find places in the foliage where it will be mostly hidden. The hot glue will seep through the inside of the stretch lace (the part that will touch her head). I did not want that scratching her head and I also wanted the candles more secure… so I cut small rectangles of matching felt and placed them on the inside of the headband. When the glue seeped through from the front when gluing on the candle, I pressed on the felt to the inside. (See images below)

  5. Hot glue a second layer of leaves and petals over the first, arranging them to hide the candle base and stretch lace entirely. I made sure that I only glued the second layer to leaves or candles so that no glue would touch the stretch lace. I added a few gold leaves in this layer because… Tolkien made me do it.

  6. Add berries if you like. I had planned to add glittery red berries from a Dollar Tree fine but it looked so pretty without that I just left it alone.

  7. Remember that this crown will be all kinds of floppy until it is on the head. The floppiness was a challenge as I worked with it and I was nervous that it wouldn’t hold up. But… it’s perfect. 

St. Lucy Crown DIY 2.jpg
St Lucy Crown 3.jpg

If you’d like to show off the results of your own crafting, I’d love to see your pictures! Feel free to email them to me so that I can give thanks to God with you for His work through your hands.

All Saints' Day Costumes for Our Big Family

With two adult children and six more kiddos all the way down to a toddler, we still have a 100% dress up rate on All Saints’ Day. While that is not something I expect or demand, I admit that it really makes me happy to see it!

We also had participation from a couple additional young adults - who are dating our adult children - and my husband also found a costume this year (“I will invest once and wear this every year until I die.”) Scroll to the end to see that one.

Ever since I accidentally threw out a decade’s worth of handmade costumes (yes, that was painful), I have been mixing it up in the interest of saving time and sanity. Half the fun for me now is finding budget friendly pre-made items that lend themselves to a little homemade tweaking. And I will do one new entirely handmade costume a year if needed.


TODDLER - ST. GEORGE

This is the only photo of him that I managed to take away from the celebration. He absolutely refused to wear his gear at the appropriate times so… we were able to catch him half dressed up through the glass door. He also refused to commit to a saint (“I’m a knight!”) so we just assigned him one and didn’t tell him.

His helmet is from the timeless Full Armor of God playset which has been with us for at least 17 years. His shield is from a dollar bin at Walmart (with lots of pen marks). His heirloom quality leather sword and belt are from Made by Alejandro.

IMG_7779 2.jpg

KINDERGARTENER - ST. LUCY

She wore a toddler version of this a few years ago (link to come) but really wanted to do it again. Since she’s a pretty sensory sensitive kid, I knew that I had to make the costume soft enough for her to actually wear. It was a complete success.

The crown looks scratchy but is actually made with very soft stretch lace as a base with the leaves individually stitched in one layer and a little glue gun action on top of that. The candles are felt with fake metallic flower pieces as flames.

All leaves and flowers were dollar store purchases. I always have flower pieces and leaves around since they are surprisingly useful. We’ve used them to make hair clips, party decor, fairy dolls, packaging, and costumes.

IMG_7808.JPG

This dress though! It’s an Amazon purchase after a thorough search between Amazon’s and eBay’s dozens of Chinese distributors. I found it selling for anywhere from $70 to $15. It takes some creative searching and time but I scored the $15 price with a longer ship time. It is thin (layer accordingly) but so feminine and gorgeous. Our plan is to dye it a pastel color for Easter since it is just too pretty to be packed away in a costume box.

You can find the dress at the following link… but keep in mind that the price and shipping times are constantly fluctuating with Amazon. The price at this link is currently $23 including shipping. Use the description to do a search for options. Flutter Sleeve Chiffon Dress

8 YEAR OLD - ST. CHRISTOPHER

He wanted to be St. Christopher and we made it happen using leftover oatmeal linen that we used last year for a St. Claire habit. Super easy stitches at the top and sides with a rough neckline and sleeves. Tied with a belt we just ripped along the grain and a quick traveler’s pouch.

The cape was just a rectangle of heavy fabric we’ve had floating around for years.

IMG_7664.jpg

St. Christopher’s flowering staff started with a branch that big brother dried and sanded. They stained and varnished and I taped and hot glued a quick mish mash of paper bag and felt leaves. No glue touched the stick so they removed the tape and have a great walking stick or prop for future projects.

IMG_7667.jpg

MIDDLE MOFFET - ST. MAGDALENE OF NAGASAKI

This was my frugal victory of the year. Obviously, FREE is the best kind of frugal win but I am really happy with this $13 project. I was originally looking at $30 Japanese kimono costumes for children and it struck me that they all looked like satin kimono bathrobes. So I looked on Amazon and found a bunch of inexpensive robes AND a coupon. You can currently still find it here with the 20% off coupon below the price: Women’s Kimono Robe

They were one-size-fits-all and looked small-ish so I figured I needed the perfect age to make it work. I removed the pockets with my seam ripper and added snaps to the robe so that it would stay closed where we wanted it to.

By the way, my Snap Setter is one of the best craft purchases I have ever made. Fifteen years of easy costume and garment closures! Highly recommended.

IMG_7613 2.jpg

I used extra pink satin that I have from my boutique baby blanket days on Etsy and I stitched the belt that came with the robe through the middle. More snaps to keep it in place. That left me with two rough tails hanging down the back which I just tucked in the top. It’s not really an authentic costume but if I squint eyes, I think it works.

IMG_7670.jpg

We found a skinny wood dowel in a craft box, broke it in half, painted it silver, and… done. Then we dug into our hair flower stash to complete the hair.

IMG_7723.jpg

JUNIOR HIGH - ST. CATHERINE OF SIENA

She chose St. Catherine because she was struck by the parallels between what was going on at St. Catherine’s time and what is happening in the Church today. She was moved by the words and actions of the saint and felt that they spoke profoundly to the need of the laity to be bolder in their defense of Jesus Christ and the Church.

I thought she might like to wear a more flowery costume this year but she asked if we could resurrect her St. Claire habit from last year and modify it to be Dominican. How could I say no?

St Catherine.jpg

I confess that it was an extremely last minute undertaking and I was shaking at the thought of having to stand in the pre-Halloween lines at Joann Fabrics. So I didn’t. Instead, I found an old black dress that I haven’t worn in years and I stole the skirt from it (ie chopped it off) to make the veil. A few stitches to hem and a couple snaps at the back of the neck and… we have a Dominican.

st Catherine2.jpg

HIGH SCHOOL - ST. OLAF

He invested his own money in this Viking costume several years ago and it is still going strong. A bit smaller than it used to be but no big deal. Sometimes a splurge is worth it. Especially for a mom who doesn’t have to put a single stitch or glue squirt on any of it.

He did upgrade his sword this year and I admit that it was pretty cool and suited to the costume. Find it HERE.

IMG_7712.jpg

I’ll just call this pic “Keeping the Saints Culturally Relevant” but I can’t figure out if St. Olaf would love it or hate it. Or maybe he had his own noble version.

IMG_7718.jpg

YOUNG ADULT - ST. KATERI

She decided which saint she was going to be in the middle of Salvation Army when she found this suede Winter jacket. Kateri lived in the North and it just makes so much sense. It was $10 and a bit on the pricey side for a used find, but it is quilted and warm. Since I found it oddly appealing, I’ve added it to my own wardrobe which has no fashion rhyme or reason. Instead of mismatched, I’ll just call it “eclectic.”

IMG_7767.jpg

She dug up some uncut faux suede fabric from our stash (likely used for a Kateri in years past) and threw together a quick dress layered over a maxi skirt. Then she added hair flowers which just seem so suited to an affectionate remembrance of the Lily of the Mohawks.

IMG_7766.jpg

I wasn’t able to get a photo of the other two participants (St. Thomas Aquinas and St. Cecilia) but I have some older pictures HERE of the St. Thomas costume.

THE CHIEF - ST. HUBERT

Years ago, my husband used to dress up as St. Francis. That stopped after I accidentally threw away his costume and he’s just been an observer ever since. But this year he told me that he found a new costume, had purchased it, and that he would wear it every year until he died. So…

Introducing St. Hubert, patron saint of hunters…

He found the sweatshirt at Catholic to the Max and also added a T-shirt (since he runs on the warm side) from a school called St. Hubert (which I can no longer find). While looking for a link to his T-shirt, I found a much cooler version on Amazon: St. Hubert Tee

I did not dress up as anyone but my children pointed out that I could have pulled off a modernized version of a Chinese saint. I can see their point and this Floral Tunic Dress did ship from China so… maybe next year I’ll come better prepared.

Honestly, shopping from Chinese shops on Amazon is super hit or miss (and we only occasionally purchase there) but this dress was actually quality construction with a soft but heavier rayon fabric. I don’t mean the fabric is heavy, just that it’s not too thin and not see through like many overseas products.

My boots are Teva’s Foxy Midcalf Boot in black leather. It’s been a while since I purchased though so I’m only finding them in different colors or bootie options. Still cute with a rugged sole for icy winters.

IMG_7811.jpg

Hopefully I can start filling in tutorial links soon. Look for St. Lucy toddler and big girl version to come first!

To be a saint... will it {All Saints' Day in a big family}

static1.squarespace-21.jpg

All Hallows' Eve. 2014.

We drove to Mass in the cold rain, costume pieces sticking up here and there and a toddler letting us know we hadn't planned nap time well. It is our family tradition to attend the vigil Mass of All Saints' Day in full costume and then go directly to our celebratory party. All the various opinions about secular Halloween vs. All Hallows' Eve aside... it's often just a crummy day for trick-or-treating in Cleveland. My heart went out to all the little Elsas... their pretty dresses covered by jackets... and their hair imperiled by raindrops. Someday, someone will get smart and move the secular holiday to July for us Northerners. It will kill two birds with one stone: 1) We won't have to decide between awesome costumes and warm/waterproof costumes and 2) We'll have the weekend free to devote to only ONE costume related party that happens to fall on one of the greatest feasts of the Church year. (Since some of you might not know where I stand on that. wink. wink.)

I dropped the kids off outside the church and kept driving in circles with the exhausted toddler. At one point, I stopped the van to climb in back and nurse her. Because there just isn't any use in bringing a hungry and tired one-year old into a quiet church until her issues are settled. A woman stopped in the rain to walk around my running van. Not able to see me behind the tinted windows, she became suspicious and wrote down my license plate number. Yes, I get it. Big white rumbling vans with tinted windows in church parking lots are creepy... especially on Halloween. I laughed and then stopped laughing... wondering if I would have to talk to a police officer while nursing a toddler dressed like St. Zita. 

Fortunately, I got our pictures taken before the downpour. With my low tech camera. My success to failure ratio in the cloudy conditions was about 1:40 since the random raindrops kept throwing my ipad out of focus. What a relief to finally get in the car and on our way after that effort! And after "someone" broke a house window with "something" (a first for us). And after Our Lady of the Snows fell out of the van and got her costume wet. And after a crying toddler increased her volume. And after... oops... I forgot to eat lunch...

HEROIC VIRTUE, DON'T FAIL ME NOW! (Open secret: The real purpose behind All Saints' Day festivities and costumes is to test out our virtue muscle. Weak and floppy? Yes. All ye holy men and women, pray for us!)

I drove the van... and it didn't stall. (Thank you, St. Christopher!) And then we attended a wonderful party at which I got a bunch of very dark and pixelated photos. Someday a DSLR. Santa?? 

I'm posting youngest to oldest here. A couple kids have noticeably more pics than the others. It's not because I love them more. It's because I made their costumes MYSELF and I'm preserving the memories I made slaving over the sewing machine. In other words, I am very proud (pray for me) and am giving in to the inclination to show off my small successes...

ST. ZITA... 

The idea for Peaches' costume came from a desire to make her a pinafore style dress that she can wear through the Winter. My fabric came from a gently used men's button down shirt and some scrap fabric and lace that have been in my stash for years. Pinterest tutorials set me in the right direction but I ended up modifying in order to make it perfectly Zita... and Peaches. Total cost: FREE (because I have no idea what I paid for the remnants and eyelet.)

We borrowed Cookie's spatula. "Give us this day our daily bread."

The kerchief was a scrap from the shirt sleeve attached to a bit of FOE (fold over elastic) because it is soft and gentle on a baby's head. Don't you just love the back of the dress? Buttons and pocket intact from the original shirt. The whole project was about 2-4 hours. It's very hard to tell total time when sewing between daily duties but that's my best guess.

ST. LOUIS...

static1.squarespace-25.jpg

I love adorable store bought costumes as much as I love handmade... because the former allows me more time to indulge in the latter. This king knight costume has been in our stash for a few years and I do like it, particularly because it fits multiple sizes. The sword and shield were gifts to Cub last year for Christmas.

static1.squarespace-26.jpg

OUR LADY OF THE SNOWS...

Another easy winner. The dress was a garage sale find with sparkle added for our Lord of the Rings party. The cape was worn by Button for her cold weather First Holy Communion. The flower was donated by a big sister.

ST. CECELIA...

Another lovely child who put together her costume mostly unassisted. The dress was a garage sale find and a Lord of the Rings party repurpose. Although she seems to have grown a bit since then and her sister had to take out the adjusted hem. My beautiful people... always growing...

ST. HUBERT...

Except for the rose brooch and arrows, this costume is entirely a repurpose from the Lord of the Rings party. Aragorn baptized into Hubert. I made the cloak way back when. The rest of the outfit was borrowed or thrifted. The bow and arrows are his. 

static1.squarespace-32.jpg

ST. PERPETUA...

static1.squarespace-34.jpg

I almost helped her with her costume. But then I didn't. Because she had already done it. I let her into my fabric stash and she designed and stitched up something rather lovely. Rather.


ST. THOMAS AQUINAS...


static1.squarespace-45.jpg

There are lots of pictures for this one because I spent the most time on it. This is how I did it: I spent about 8 hours buying fabric, fretting over what I should do with it, researching DIY patterns on the internet, and being generally grumpy with my kids. Then I threw my hands in the air, admitted defeat and sent Professor and Crash to the fabric store to buy a couple patterns. Great decision... 

There are 7 basic elements to this costume: 1) White Hooded alb 2) White Scapular 3) Black Cape 4) Black Hooded cowl 5) Black belt/rope 6) Tonsure 7) Rosary.


I modified a basic costume tunic pattern by adding a hood. The cloak and cowl were modified from a vampire style costume pattern. For materials, I used white cotton and a lovely black wool/poly blend that I scored for 65% off. This is not a throw-away costume. He will wear it every year of his life and provide photographic proof to me within a week of All Saints Day. Or else.

static1.squarespace-39.jpg

THE TEAM...


static1.squarespace-40.jpg

THE REST OF THE STORY...

static1.squarespace-41.jpg

You know they all come from a big family because no one is freaking out about a one-year old throwing herself (voluntarily) off the step in a fit of toddler rage. And they caught her before she landed. Impressive. You know I'm the mother of a large family because I just stood there and took pictures.


MY COSTUME...

A harried-hoodie-wearing-big-van-driving-homeschooling-mama-with-sleeping-baby. So... did I pull it off??


Chewing on a toy found on the van floor. Waiting for the cops to arrive. They never did. My guess is that they were preoccupied with the gaggle of preteen boys running through the parking lot wearing black hoodies and white hockey masks and wielding bloody plastic machetes.

I hope that your feast day celebrations were wonderful! Link to your costume/celebration posts if you'd like in the comments. I'd love to see them. Costumes are not necessary to enter into the richness of the liturgical year but they sure do add to the fun and make the feast days memorable for the kids! And for the big people. Sometimes it even raises the most important of life's questions. Such as... Do Dominicans really wear plaid shorts under their habits??

static1.squarespace-44.jpg

How to Make Priest Biretta for All Saints' Day

1412044986021.jpeg

After writing about my kids' All Saints' costumes last year, I received multiple requests for a pattern for the boys' birettas. So here you go!

The source pattern is for a real biretta so I have to warn you that I used extensive creative license with the it and produced great costume pieces -- not real birettas. 

1412045030923.jpeg
1412045074948.jpeg

Our All Saints' costumes from last year were a great success, mostly because the teenagers gave full participation. And wouldn't you if your mom stayed up until the wee hours crafting an awesome biretta for your priestly garb? Of course you would. And now you want to know how to share this excellence with your kids... so I will give you the link to the instructions and a few (very important and necessary) words about my crafting adventure.

First, the link to the PDF pattern: 
How to Make a Collapsible Biretta


UPDATE: Lena at Joyfilled Family now has a picture tutorial that walks you through the steps. Check it out HERE.


Now, a few words:

I did not make collapsible birettas. My birettas only collapse if you sit on them. I used the pattern provided, fused fabric to the pattern pieces, and glued the pieces until I was reasonably sure they would not collapse under normal stresses. It was a hack job but perfect for costume purposes.

All materials for this project were things I already had on hand:

  • Poster board

  • Heat n Bond to fuse the fabric to the poster board.

  • Black fabric. I used a wool/cashmere blend fabric because it was the only black fabric I had on hand. (My sons had the warmest birettas ever made.) This would have been easier with a lighter fabric but the heavy stuff did lend the finished product a bit of weight and it stuck to their hair well.

  • Satin fabric. Because I tend towards crafty perfectionism even at 3am. And because glue guns are awesome. And because I had scraps of satin fabric... I lined the inside of the hats. I wanted red but gold was a fine alternative.

  • Red Piping Bias Tape on Professor's Fulton Sheen biretta. (I left a gap at the top of the poster board when I glued it so that I could hot glue the piping in later.)

  • Red Yarn for the pom pom and a plastic pom pom maker. But you can use these instructions if you don't have one.


1412045203495.jpeg

This is the 2-year old's biretta. Because I didn't have enough piping bias, I used hot glue to strengthen the attaching pieces. And because the hot glue was ugly, I decided to paint it with a black paint pen. And because the black paint pen was "glossy" the seams are shiny. I wasn't thrilled. You can also see here how the lining is far from perfect -- just folded and glued in place -- but also how a kid would think it is cooler than plain black.


Measuring...

The other thing I want to tell you is that I found the measurements tricky. I was not particularly careful and was rushing.  I measured once (hastily) for the Professor (15 years old at the time) and ended up with a hat that fit a two-year old. Fortunately, I had a two-year old on hand, but you should probably take more time to measure than I did. And then... I made the second one too small as well but it was much closer and wearable. I'm not making a third one, son.

The rest of the costume:

  • Altar server cassock that fits (like Professor's) or even one that is several sizes too large held together with thread and safety pins (like Cub's). Or... DIY if you are totally awesome.

  • Red or black sash. Lend your kid one of your inexpensive pashmina scarfs that he can poke a hole through with a dull safety pin. Let it go. It's for a good cause.

  • Roman Collar. You could probably come up with something better but I picked out two lengths of wide white satin ribbon (wide enough to cover the notch and extend a bit above the collar), measured necks, and stiffened it with Heat n Bond. Then I used sticky Velcro dots to hold the collar together and in place on the cassock. The other option was to sew something in but I didn't want to alter the cassocks too much.

1410715804183.jpeg

Are you going to try your hand at making a biretta for All Saints's Day? 

Please link your pics back here in the comments (or email them to me) if you do. I would love to see your creations and I'll add your link to the post.